3 Ingredient Peanut Butter Cookies: Chewy and Easy
- Bake the Ultimate 3 Ingredient Peanut Butter Cookie
- Why This Flourless Method Wins
- Vital Timing and Serving Stats
- Choosing Your Three Main Components
- Basic Tools for Success
- Mixing and Baking Step-by-Step
- Solutions for Common Baking Issues
- Creative Flavor Boosts to Try
- Storing and Refreshing Your Treats
- The Best Sides and Sips
- Recipe FAQs
- 📝 Recipe Card
Bake the Ultimate 3 Ingredient Peanut Butter Cookie
Forget everything you know about traditional baking. You've probably been told that you need a pantry full of flour, baking powder, and softened butter to create a decent batch of sweets. That is a total myth.
Honestly, some of the most indulgent, melt in-your mouth treats I've ever pulled out of my oven come from just three basic staples sitting in your cupboard right now. Discover our simple yet decadent 3 Ingredient Peanut Butter Cookie with Vanilla for a perfect homemade treat.
The first time I tried this, I was skeptical. I thought the dough would be a greasy mess or, worse, a rock hard puck. But then the aroma hit me. It's that deep, roasted scent of toasted nuts and caramelized sugar that fills every corner of the house.
When I took that first bite, the edges gave way with a delicate shatter, leading into a center so velvety it felt like pure fudge. It’s a sensory experience that proves sometimes, less really is so much more.
We’ve all had those days where the craving for something sweet and buttery hits hard, but the thought of cleaning up a dozen measuring spoons feels like too much work. That’s where this recipe shines.
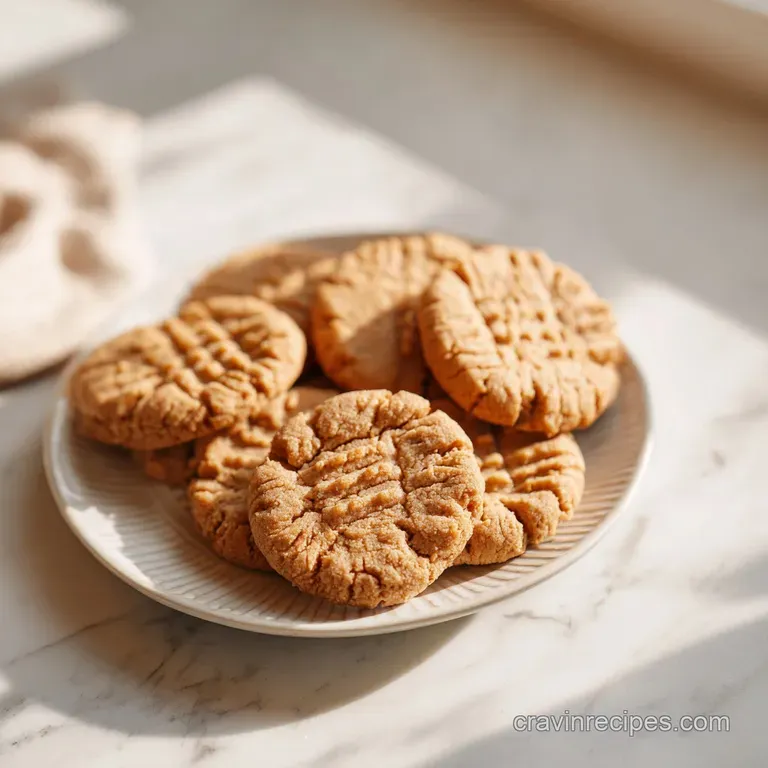
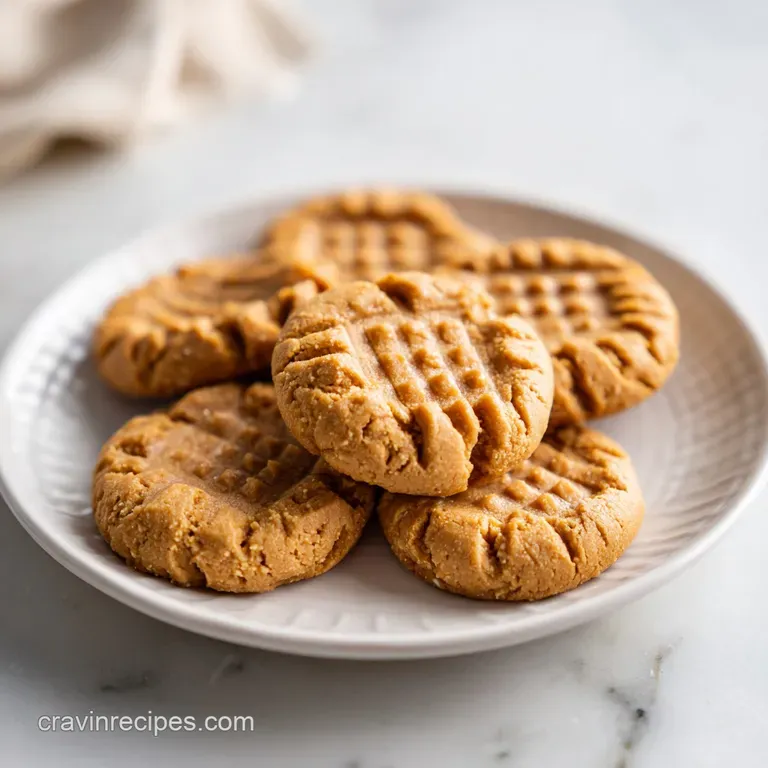
It is pure, unadulterated peanut flavor backed by a sugary crunch that’ll have you reaching for the milk carton before the tray even cools down. Trust me, once you see how that fork pressed crosshatch turns golden and crisp, you’ll never go back to the complicated stuff.
Why This Flourless Method Wins
- Protein Binding: The egg acts as the sole structural architect, using its proteins to coil around the fat and sugar molecules, creating a cohesive dough without needing any gluten.
- Sugar Caramelization: Without flour to buffer the heat, the granulated sugar undergoes rapid pyrolysis, leading to those signature crispy, deeply bronzed edges.
- Fat Emulsification: Vigorously beating the mixture for 60 seconds forces the natural peanut oils to bond with the egg lecithin, preventing a greasy finish and ensuring a uniform, sandy crumb.
- Moisture Migration: The absence of starches means moisture evaporates quickly during the 10 minute bake, resulting in a concentrated flavor profile that isn't diluted by bland fillers.
| Thickness | Internal Temp | Rest Time | Visual Cue |
|---|---|---|---|
| 0.5 inch (pressed) | 165°F (74°C) | 5 minutes | Golden edges, matte surface |
| 0.75 inch (thick) | 170°F (77°C) | 8 minutes | Slightly soft center, firm rim |
| 0.25 inch (thin) | 160°F (71°C) | 3 minutes | Deep bronze, snappy texture |
Choosing the right method for your kitchen setup can change the final texture of your cookies significantly. While the oven is the gold standard for that even, golden brown finish, some people experiment with alternative heat sources when they're in a pinch or working with small batches.
| Method | Time | Texture | Best For |
|---|---|---|---|
| Standard Oven | 10 minutes | Crispy edges, soft core | Traditional results |
| Toaster Oven | 8 minutes | Very crunchy exterior | Small single batches |
| Stovetop (Pan) | 12 minutes | Soft, almost pancake like | No oven emergencies |
Vital Timing and Serving Stats
When you're racing against a sugar craving, every second counts. This recipe is designed for maximum efficiency without sacrificing that gooey, rich quality we all love. You’re looking at a total commitment of just 15 minutes from the moment you grab the bowl to the moment you’re staring at a tray of 18 cookies.
The Protein Binding Secret
The egg isn't just a liquid; it's the glue. When you beat it into the peanut butter, you’re creating a network of proteins that trap the air and fat. This is what gives the cookie its lift and prevents it from just melting into a puddle of oil on your baking sheet.
Accelerated Caramelization
Because there is no flour to hide behind, the sugar is the star of the show. It reacts directly with the heat, turning into a delicious, brittle lace on the bottom of the cookie. This happens fast, so sticking to the 8 to 10 minute window is critical.
Naturally Low Glycemic Potential
If you're watching your refined sugar intake, swapping the granulated white sugar for coconut sugar is a brilliant move. It adds a hint of caramel and toastiness that complements the nuts while keeping the glycemic index a bit lower than the classic version.
| Ingredient | Science Role | Pro Secret |
|---|---|---|
| Peanut Butter | Primary Fat/Body | Use "No Stir" for a smoother, more consistent dough |
| Granulated Sugar | Structure/Browning | Use extra fine crystals for a more delicate, melting texture |
| Large Egg | Emulsifier/Binder | Ensure it's at room temperature to bond faster with the oils |
Choosing Your Three Main Components
To make a 3 Ingredient Peanut Butter Cookie with Vanilla, you need to start with the best basics. I always reach for a creamy, commercial style peanut butter because the stabilizers help keep the dough consistent. Natural oils can sometimes separate and make your life difficult, though I've found ways around that too.
- 1 cup (250g) creamy peanut butter: Why this? Provides the fat, protein, and primary flavor base for the entire cookie.
- 1 cup (200g) granulated sugar: Why this? Creates the crisp edges and sweetness required to balance the salty nuts.
- 1 large egg: Why this? The essential binder that prevents the flourless dough from crumbling apart.
| Original Ingredient | Substitute | Why It Works |
|---|---|---|
| Creamy Peanut Butter | Almond Butter | Similar fat content. Note: Resulting cookies are slightly grittier and less sweet. |
| Granulated Sugar | Brown Sugar | Adds moisture. Note: Cookies will be much softer and chewier, less crisp. |
| Large Egg | Flax Egg (1 tbsp meal + 3 tbsp water) | Provides binding. Note: Cookies will be denser and won't rise as much. |
While the recipe is famously simple, don't be afraid to add a tiny splash of vanilla extract if you have it on hand. It rounds out the flavors and makes the whole kitchen smell like a professional bakery. If you're looking for other soft peanut butter cookies, you'll notice how that little hit of vanilla really bridges the gap between salty and sweet.
Basic Tools for Success
You don't need a high end stand mixer for this, although a KitchenAid certainly makes quick work of the beating phase. A sturdy bowl and a silicone spatula are really your best friends here. I prefer a spatula over a whisk because the dough gets quite stiff and heavy once that egg is fully incorporated.
For the baking surface, parchment paper is non negotiable. Because these cookies have a high sugar and fat content, they love to stick to bare metal. A silicone baking mat also works wonders, giving the bottoms a perfectly even tan without any scorched spots.
Chef's Tip: Freeze your fork in the freezer for 10 minutes before doing the crisscross patterns. The cold metal prevents the dough from sticking to the tines, ensuring those lines stay sharp and clean after baking.
Mixing and Baking step-by-step
- Preheat your oven to 350°F (175°C). In a large mixing bowl, combine the peanut butter, sugar, and egg. Note: Starting with a hot oven is key for that immediate sugar sear.
- Beat the mixture vigorously with a spatula for approximately 60 seconds until the batter transforms into a stiff, matte dough that pulls away from the sides of the bowl.
- Scoop rounded tablespoons of dough (about 1 inch in diameter) and roll them into smooth spheres. Note: Rolling them between your palms helps warm the oils for a smoother finish.
- Place them 2 inches apart on a parchment lined baking sheet. until they look evenly spaced and ready for pressing.
- Use the tines of a fork to press a criss cross pattern into each ball, flattening the dough evenly.
- Bake in the center rack for 8 to 10 minutes until the edges are golden and the surface is set.
- Remove from the oven and let them rest on the hot pan for 5 minutes. Note: This carryover cooking finishes the center without burning the bottom.
- Transfer to a wire rack to cool completely until the texture becomes firm and snappy.
Solutions for Common Baking Issues
Sometimes even the simplest recipes can go sideways. If your kitchen is particularly warm or your peanut butter is extra oily, you might run into a few snags. But don't panic! Most issues with this Butter Cookie with Vanilla are easily fixed with a few temperature adjustments or a bit more mixing.
To Fix Crumbly Cookies
If your cookies are falling apart the moment you touch them, you likely didn't beat the dough long enough. That 60 second vigorous mix is where the magic happens. You need to really work that egg into the nut butter to create a strong protein bond.
If they're already baked and crumbly, try chilling them in the fridge; the cold will help the fats solidify and hold everything together.
To Prevent Greasy Spreading
Using a "natural" peanut butter where the oil separates can lead to a puddle of grease on your tray. If you see oil pooling in your bowl, stir in an extra tablespoon of sugar or chill the dough for 15 minutes before rolling.
This helps the sugar absorb some of that excess oil and keeps the cookie’s shape intact during the bake.
| Problem | Root Cause | Solution |
|---|---|---|
| Cookies are too dry | Overbaked or too much sugar | Reduce bake time by 2 mins; check oven temp with a thermometer. |
| Hard as a rock | High heat or overcooking | Store with a slice of bread to soften; bake only until edges are pale gold. |
| Stuck to the pan | No parchment used | Use a thin metal spatula to gently pry them off while still slightly warm. |
Common Mistakes Checklist
- ✓ Never use "low-fat" peanut butter; the lack of real fat destroys the texture.
- ✓ Avoid skipping the parchment paper; these will bond to your tray like superglue.
- ✓ Don't overcrowd the pan; leave a full 2 inches for heat circulation.
- ✓ Let them rest on the pan; moving them too soon will cause them to shatter.
- ✓ Check your oven temperature; 350°F is the sweet spot for sugar caramelization.
Creative Flavor Boosts to Try
Once you've mastered the basic 3 Ingredient Peanut Butter Cookie, the sky is the limit for variations. This dough is an incredible canvas for all sorts of indulgent additions. If you’re feeling like something even more decadent, you could try making a version of these brown butter treats by adding a teaspoon of browned butter to the mix.
The Salted Dark Chocolate Twist
Gently press a single dark chocolate disk or a few chunks of high-quality baking chocolate into the center of each cookie immediately after they come out of the oven. The residual heat will melt the chocolate into a gooey pool. Top with a tiny pinch of flaky sea salt to make the nut flavor really pop.
The Espresso Kick
For the coffee lovers, adding half a teaspoon of instant espresso powder to the dough changes everything. It doesn't make the cookie taste like a latte; instead, it deepens the roasted notes of the peanut butter and makes the sugar taste almost like toasted marshmallows.
The Seed Butter Alternative
If you have a nut allergy in the house, you can swap the peanut butter for sunflower seed butter (like SunButter). Just a heads up: a natural chemical reaction between the sunflower seeds and the baking heat can sometimes turn the inside of the cookies a bright, harmless green!
It’s a fun science experiment that still tastes like a rich Cookie with Vanilla.
Storing and Refreshing Your Treats
Because these are flourless, they stay moist much longer than a standard cookie. You can keep them in an airtight container at room temperature for up to 5 days. If they start to get a bit too soft, a quick 30 second zap in the air fryer or a 2 minute stay in a warm oven will bring back that signature edge crunch.
For long term storage, these cookies freeze beautifully. I actually prefer eating them straight from the freezer sometimes they get a chewy, taffy like texture that is incredibly satisfying. Just make sure to layer them with parchment paper in your freezer bag so they don't stick together.
They'll stay fresh for up to 3 months.
Chef's Tip: If you find your leftovers have gone a bit stale, crumble them over a bowl of vanilla bean ice cream. The high fat content of the cookie makes it the perfect "mix in" that won't get soggy in the cream.
The Best Sides and Sips
These cookies are intensely rich, so you need something to cut through that butter and sugar. A tall, ice cold glass of whole milk is the classic choice for a reason the fat in the milk helps cleanse the palate of the sticky peanut butter.
If you're feeling fancy, a cold brew coffee with a splash of cream provides a bitter contrast that makes the cookies feel like a gourmet dessert.
If you’re hosting a little get together, these pair wonderfully with a sharp fruit platter. Think crisp apple slices or tart raspberries. The acidity of the fruit balances the heavy, nutty notes of the cookie perfectly.
It’s a simple way to turn a 3 ingredient pantry staple into a well rounded snack plate that looks like it took much more effort than 15 minutes.
Right then, you're all set! Grab your jar of peanut butter and get to mixing. It's brilliant how something so simple can result in such a sophisticated, melt in-your mouth treat. Trust me on this one once you see that golden brown crosshatch, you'll be as obsessed as I am. Happy baking!

Recipe FAQs
Is it true I must use natural peanut butter for the best texture?
No, this is a common misconception. You must use regular creamy peanut butter; "low-fat" or overly natural varieties lack the specific fat content required to hold these cookies together.
How to ensure the dough reaches the right consistency?
Beat the mixture vigorously with a spatula for 60 seconds. You are looking for the batter to transform into a stiff, matte dough that pulls cleanly away from the sides of the bowl.
Why did my cookies stick to the baking sheet?
You skipped the parchment paper. Without a parchment liner, the high sugar content causes the cookies to bond to your tray like superglue during the baking process.
How to get that signature criss cross pattern?
Use the tines of a fork to press into the dough balls. Pressing firmly flattens the spheres evenly, ensuring the edges bake at the same rate as the center.
How to keep these cookies from shattering when moving them?
Let the cookies rest completely on the baking sheet after removing them from the oven. If you enjoyed mastering the fudgy texture of other cookies, you will notice that this flourless recipe requires a cooling period to set its structure before you can handle them safely.
Can I bake these at a higher temperature to save time?
No, stick to 350°F (175°C). This specific temperature is the sweet spot for proper sugar caramelization; higher heat will burn the sugars before the center of the cookie is set.
How to refresh cookies that have lost their crunch?
Place them in a 350°F oven for 2 minutes. This brief heat exposure restores that signature edge crunch that can sometimes soften after a few days of storage.
3 Ingredient Peanut Butter Cookies

Ingredients:
Instructions:
Nutrition Facts:
| Calories | 129 kcal |
|---|---|
| Protein | 3.8 g |
| Fat | 7.2 g |
| Carbs | 13.9 g |
| Fiber | 0.8 g |
| Sugar | 12.4 g |
| Sodium | 63 mg |
