Apple Pie Filling Recipe: Tender Crisp Apples
- Time: Active 15 minutes, Passive 10 minutes, Total 25 minutes
- Flavor/Texture Hook: Spiced, syrupy, and tender crisp apples
- Perfect for: Holiday baking, weekend tarts, or indulgent topping
- Best Homemade Apple Pie Filling Recipe
- The Science of Sweet Aroma
- Component Analysis and Science
- Essential Elements and Substitutes
- Necessary Tools for Success
- The Step by Step Process
- Solving Common Filling Issues
- Creative Flavor Profile Twists
- Adjusting Batch Size Correctly
- Storage and Waste Minimization
- Serving and Pairing Ideas
- Recipe FAQs
- 📝 Recipe Card
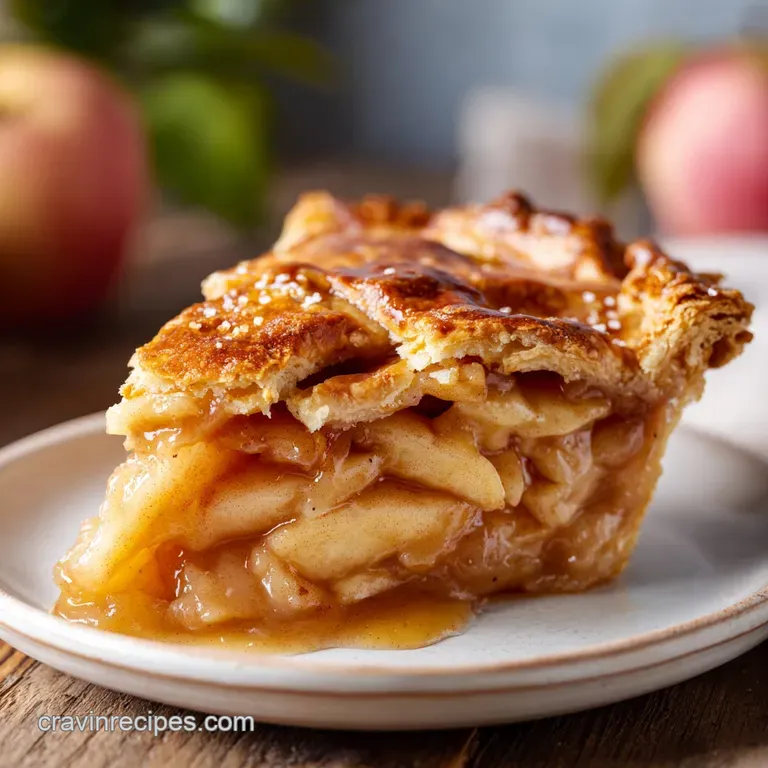
Best Homemade Apple Pie Filling Recipe
Close your eyes and imagine the scent of butter hitting a warm pan, quickly followed by the deep, molasses heavy aroma of brown sugar. It is that specific, intoxicating fragrance that signals something truly indulgent is happening in the kitchen.
I remember the first time I ditched the canned stuff; it was a rainy Tuesday, and I had a bag of Honeycrisps that were just starting to lose their snap. The moment the cinnamon bloomed in the bubbling butter, I knew I could never go back to that gelatinous, tin scented substitute.
The magic of a truly great filling isn't just in the sugar, but in the way the apples soften without turning into mush. You want a bite that offers a tiny bit of resistance a tender "give" that feels luxurious on the tongue.
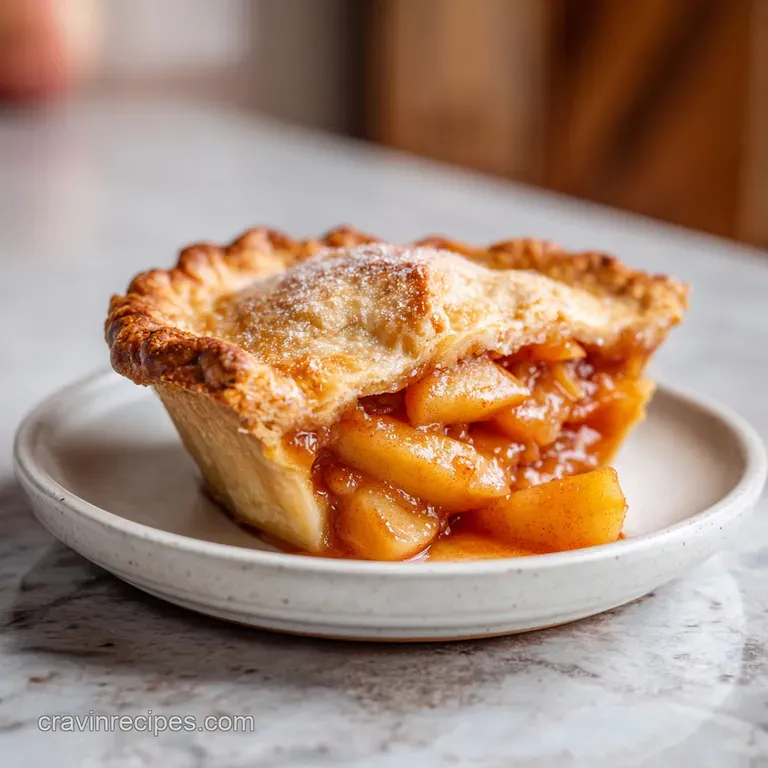
We’ve all had those pies where the fruit has dissolved into a sad, watery sauce, but that won't happen here. We are going for a thick, translucent glaze that hugs every slice of fruit like a warm blanket.
Right then, let's get into the heart of why this works so well. It is a foolproof method that relies on basic kitchen chemistry to ensure your tarts and pies never have a "soggy bottom." We are going to treat the fruit with respect, coaxing out the juices and then thickening them into a syrup that would make a professional baker weep with joy.
Trust me on this, once you smell this simmering on your stove, your neighbors might just start knocking on your door.
The Science of Sweet Aroma
Starch Gelatinization: Cornstarch molecules swell and burst when heated with liquid, creating a thick, glossy matrix that suspends the apples.
Pectin Preservation: Adding lemon juice lowers the pH, which helps the fruit’s natural pectin stay firm so the apples don't turn into applesauce.
Maillard Reaction: The proteins in the butter react with the sugars under heat, developing those deep, toffee like flavor notes that define a classic bake.
| Method | Time | Texture | Best For |
|---|---|---|---|
| Stovetop (This Recipe) | 10 minutes | Tender crisp apples | Tarts, cheesecakes, immediate use |
| Traditional Bake | 45 minutes | Very soft fruit | Deep dish double crust pies |
| Slow Cooker | 3 hours | Jam like consistency | Large batches, apple butter vibes |
This stovetop method is my absolute favorite because it gives you total control over the texture. You can stop the cooking the exact second the apples reach that velvety stage you love. Plus, it smells incredible much faster than a slow cooker version.
Component Analysis and Science
| Ingredient | Science Role | Pro Secret |
|---|---|---|
| Granny Smith Apples | Structural Integrity | These hold their shape best due to high pectin and low moisture. |
| Brown Sugar | Hygroscopic Sweetener | Draws moisture out of the fruit while adding a deep molasses undertone. |
| Cornstarch | Viscosity Agent | Provides that clear, professional looking thick glaze that doesn't weep. |
| Lemon Juice | Enzymatic Inhibitor | Prevents browning and balances the cloying sweetness with essential acidity. |
Essential Elements and Substitutes
To make this apple pie filling recipe, you'll need 1.36 kg (3 lbs) of Granny Smith or Honeycrisp apples. I prefer a mix of both for a balance of tartness and sweetness. You’ll also need 15 ml (1 tbsp) of lemon juice to keep things bright.
For the richness, 28 g (2 tbsp) of unsalted butter is non negotiable don't even think about using margarine here.
The sweetness comes from a blend of 100 g (1/2 cup) packed brown sugar and 50 g (1/4 cup) granulated sugar. Why this? The brown sugar adds moisture and depth, while white sugar ensures a clean sweetness. Spices are key: 1.5 tsp ground cinnamon, 1/4 tsp ground nutmeg, and 1/4 tsp fine sea salt to make the flavors pop.
To thicken it all up, grab 16 g (2 tbsp) of cornstarch and 60 ml (1/4 cup) of water or apple cider. Finally, 5 ml (1 tsp) of vanilla extract added at the end provides that final floral note.
If you find yourself missing an ingredient, don't panic. You can swap the cornstarch for arrowroot powder if you need a grain free option, though it might be slightly more "stretchy" in texture. If you're out of brown sugar, use all white sugar plus a teaspoon of molasses. If you happen to be making a larger dessert spread, this filling pairs beautifully with my Mini Cheesecake Recipe, providing a spiced contrast to the creamy base.
Necessary Tools for Success
You don't need a high tech laboratory to get this right, but a few specific tools make the job much easier. A heavy bottomed skillet or a medium saucepan is vital; you want even heat distribution so the sugar doesn't scorch in one spot while staying grainy in another.
A sharp vegetable peeler and a sturdy corer will save you twenty minutes of frustration, trust me.
I also recommend using a silicone spatula for stirring. It allows you to scrape the bottom of the pan effectively, ensuring the cornstarch slurry is fully integrated into the syrup. If you're planning on using this for a crowd, much like my Southern Baked Mac recipe, you might want to have a large glass bowl ready to let the filling cool completely before you start assembling your pastries.
The step-by-step Process
1. The Fruit Prep
Peel, core, and slice your 1.36 kg of apples into 6 mm (1/4 inch) thick wedges. Toss them immediately with the 15 ml of lemon juice. Note: This prevents oxidation and starts breaking down the surface starches.
2. The Butter Base
Melt the 28 g of butter in your large skillet over medium heat until it begins to foam and sizzle gently.
3. Creating the Syrup
Add both the brown and granulated sugars, cinnamon, nutmeg, and salt to the melted butter. Stir with your spatula until the mixture looks like wet sand and starts to bubble.
4. Sautéing the Apples
Fold the sliced apples into the sugar mixture. Cook for about 5 to 7 minutes, stirring occasionally. You are looking for the apples to release their juices and become slightly translucent around the edges. The kitchen will start to smell like a toasty, spiced autumn morning.
5. Slurry Preparation
While the apples simmer, whisk the 16 g of cornstarch into the 60 ml of water or cider in a small cup. Ensure there are zero lumps.
6. Thickening the Glaze
Pour the cornstarch slurry into the pan while stirring constantly. Watch as the cloudy liquid turns clear and thickens into a velvety glaze in about 1 minute.
7. The Final Touch
Remove the pan from the heat and stir in the 5 ml of vanilla extract. The aroma will shift from purely spiced to a sweet, floral finish.
8. The Cooling Phase
Transfer the filling to a shallow dish to cool. Note: Cooling is essential if you're putting this in raw pastry; hot filling will melt the fat in the crust and cause sogginess.
Solving Common Filling Issues
The biggest heartbreak in fruit baking is a runny filling. Usually, this happens because the cornstarch wasn't "activated" by enough heat, or the apples were particularly juicy that day. If your sauce looks more like soup than syrup, don't worry it’s an easy fix. But what about the opposite?
Sometimes it can get too thick, turning into a gluey mess. We'll solve that by adjusting the liquid ratio.
Why Your Filling Is Watery
If your apples release a ton of moisture, the syrup might stay thin. This often happens with older fruit or specific varieties like McIntosh. You need to ensure the mixture reaches a full simmer for at least a minute to allow the cornstarch to do its job.
| Problem | Root Cause | Solution |
|---|---|---|
| Thin/Runny Sauce | Inactive cornstarch | Simmer for 1 extra minute until bubbling hard. |
| Cloudy Filling | Flour used instead | Use cornstarch and whisk well before adding. |
| Mushy Apples | Sliced too thin | Keep slices at exactly 6 mm (1/4 inch) thickness. |
Common Mistakes Checklist
- ✓ Pat the apples dry if you washed them after slicing to avoid extra water.
- ✓ Use a heavy bottomed pan to prevent the sugar from burning.
- ✓ Always whisk the cornstarch into cold liquid before adding it to the hot pan.
- ✓ Let the filling cool completely to room temperature before using it in a pie.
- ✓ Don't overcook the apples will continue to soften as they cool.
Creative Flavor Profile Twists
If you want to get a little fancy, there are endless ways to tweak this apple pie filling recipe. A splash of bourbon added right at the end (with the vanilla) gives it a sophisticated, smoky edge that is incredible with vanilla bean ice cream.
You could also toss in half a cup of dried cranberries or golden raisins during the sautéing step for a bit of chew and tartness.
Locking in Fruit Texture
The key to keeping that "bite" is the thickness of your slices. If you go too thin, they dissolve. If you go too thick, the outside is mushy while the inside is raw. Stick to that 6 mm (1/4 inch) rule for the most indulgent experience.
Balancing Sweetness Profiles
I love using a bit of apple cider instead of water for the slurry. It reinforces the fruit flavor and adds a natural tang that water just can't provide. If you’re making a Whole Grain Bread recipe, imagine a thick layer of this filling spread over a toasted slice it’s basically a deconstructed pie.
If you want X, do Y
- If you want a Caramelized Flavor: Cook the butter and sugar for 2 minutes longer before adding apples.
- If you want Maximum Crunch: Use only Granny Smith apples and reduce cook time by 2 minutes.
- If you want a Healthier Spin: Replace granulated sugar with maple syrup (syrup will be thinner).
Adjusting Batch Size Correctly
Scaling this recipe is fairly straightforward, but you have to watch the liquids. If you’re doubling the batch for a massive holiday gathering, you don't necessarily need to double the water. Start with 1.5 times the liquid and see how the consistency looks.
Too much liquid in a large batch can make the thickening process take forever, which overcooks the fruit.
For a half batch, simply halve everything, but use a smaller pan. If you use a giant skillet for three apples, the syrup will evaporate too quickly and you’ll end up with scorched sugar. Also, remember that spices don't always scale linearly.
If you're making a 4x batch, maybe stop at 3x the nutmeg it can get overwhelming very quickly.
Freezing Your Fruit Batch
This is a fantastic apple pie filling recipe for freezing. If you have a backyard tree and a sudden surplus, cook the filling as directed, let it cool completely, and then seal it in heavy duty freezer bags. It will stay fresh for up to 6 months. When you're ready to bake, thaw it in the fridge overnight.
You might need to give it a quick stir as it thaws to re incorporate any separated juices.
Debunking Kitchen Myths
One common myth is that you must use only tart apples for filling. While tart apples provide a great contrast, a mix of sweet and tart actually creates a more complex flavor profile. Another myth is that you need flour to thicken pie filling.
Flour works, but it leaves the sauce cloudy and slightly "pasty." Cornstarch is the secret to that clear, jewel toned finish we all crave.
Storage and Waste Minimization
Store your finished filling in an airtight container in the refrigerator for up to 5 days. It actually gets better after 24 hours as the spices have more time to infuse into the fruit. If you find yourself with leftover syrup but no apples, save it!
That liquid gold is amazing drizzled over oatmeal, pancakes, or even whisked into a morning latte for a DIY apple pie spice drink.
Don't throw away those apple peels and cores! You can simmer them with a bit of water, a cinnamon stick, and a spoonful of sugar to create a quick stovetop potpourri that makes your whole house smell like a professional bakery.
Or, if you're feeling ambitious, boil the scraps down, strain them, and you've got a start for homemade apple jelly. Zero waste and maximum flavor that's the way we do it.
Serving and Pairing Ideas
While this is obviously intended for pies, don't let that limit your imagination. This filling is a total superstar when served warm over a bowl of high-quality vanilla bean ice cream. The heat from the apples melts the ice cream just enough to create a creamy, spiced sauce that is simply indulgent.
If you're hosting a brunch, try folding this into crepes or using it as a topping for thick cut brioche French toast. For a lighter dessert, you could layer it with Greek yogurt and granola for an "apple pie parfait." And if you have leftover berries from making a No Bake Strawberry recipe, toss them in with the apples for a mixed fruit delight that will keep everyone coming back for seconds.

Recipe FAQs
Should I cook apples before putting them in a pie?
Yes, pre-cooking is highly recommended. Cooking the filling on the stovetop first ensures the apples soften properly, prevents a watery bottom crust, and allows you to control the final thickness of the glaze.
How do you make the filling of an apple pie?
Melt butter in a skillet, then stir in sugars and spices until bubbling, add sliced apples, and sauté until they begin to soften. Whisk cornstarch into cold liquid separately, then pour into the pan while stirring until the sauce thickens to a clear glaze.
What is the secret ingredient in apple pie?
Lemon juice is the unsung hero. It provides essential acidity to balance the rich brown sugar, and critically, it helps preserve the fruit's pectin, keeping your apple slices tender crisp instead of mushy.
What is the best thickener for apple pie filling?
Cornstarch is the superior thickener for pie filling. It creates a glossy, translucent glaze that perfectly coats the fruit, unlike flour which often results in a cloudy or dull sauce.
Is it true I must use only Granny Smith apples for pie filling?
No, using a blend is better. While Granny Smiths offer necessary structure and tartness, mixing them with a sweeter variety like Honeycrisp provides a deeper, more complex flavor profile.
How long should I cook the apples to prevent mushiness?
Sauté apples for 5 to 7 minutes on the stovetop. The key is removing the pan from the heat the moment the cornstarch slurry has visibly thickened and turned clear; the apples will continue softening as they cool.
Can I use substitutes for brown sugar in apple pie?
Yes, you can substitute, but expect a flavor shift. If you use only white sugar, you will miss the molasses depth; you can compensate by adding 1 teaspoon of molasses to the mixture, similar to how we balance acidity in the [Cinnamon Rolls for recipe] glaze.
Best Apple Pie Filling Recipe

Ingredients:
Instructions:
Nutrition Facts:
| Calories | 198 kcal |
|---|---|
| Protein | 0.5 g |
| Fat | 3.1 g |
| Carbs | 45.4 g |
| Fiber | 4.1 g |
| Sugar | 37.5 g |
| Sodium | 74 mg |
