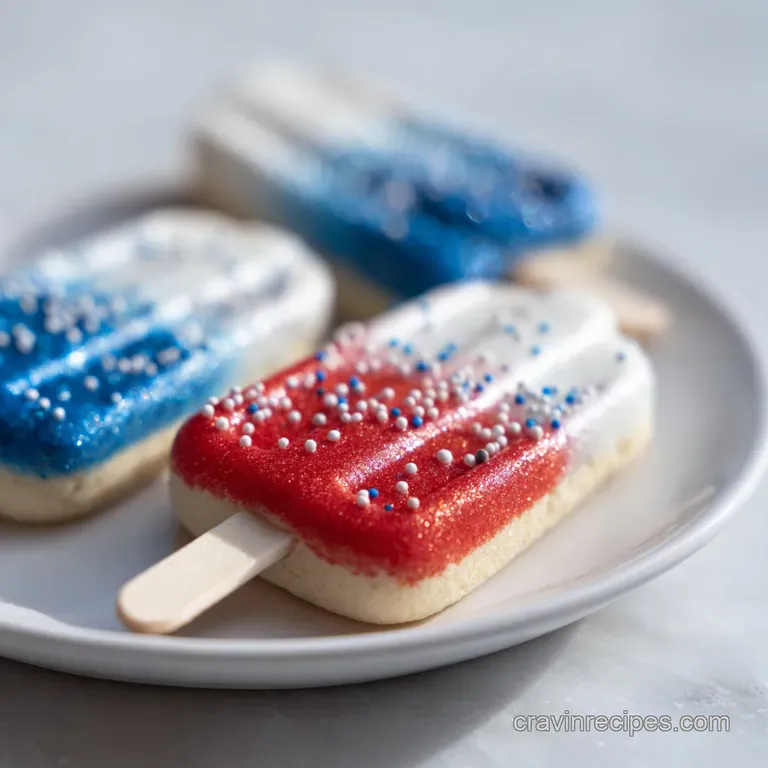
Bomb Pop Cookies: Vibrant and Patriotic Sugar Cookies
- Time: Active 33 minutes, Passive 102 minutes, Total 135 minutes
- Flavor/Texture Hook: Shatter crisp edges with a buttery, almond scented center
- Perfect for: Fourth of July block parties and nostalgic summer celebrations
- Mastering the Vibrant Layers of Bomb Pop Cookies
- Essential Recipe Specifications and Visual Checkpoints
- Selecting the Finest Elements for Saturated Color
- Necessary Kitchen Gear for Sharp Geometric Edges
- Crafting the Iconic Three Tone Summer Silhouette
- Fixing Common Decorative Baking and Shaping Hurdles
- Adjusting for Large Summer Party Crowds
- Debunking Common Sugar Cookie Misconceptions
- Inclusive Dietary Swaps for Every Picnic Guest
- Preserving That Freshly Baked Snap and Texture
- Flavorful Accompaniments for Your Festive Dessert Platter
- Recipe FAQs
- 📝 Recipe Card
Mastering the Vibrant Layers of Bomb Pop Cookies
I still remember the first time I pulled a tray of these out of the oven. The kitchen smelled like a mix of warm butter and that specific, sugary vanilla scent that only reminds you of childhood summers. My first attempt at making these was a total disaster because I thought I could rush the chilling process.
I ended up with "Bomb Pop Blobs" that looked more like a tie dye accident than a classic rocket popsicle. But then, I discovered the secret weapon in my fridge: Greek yogurt. It changed the entire game.
The Greek yogurt is the absolute hero of this dough. Most sugar cookies rely solely on butter for moisture, which is great for flavor but terrible for structural integrity when you’re trying to build layers.
The yogurt adds a subtle tang that cuts through the sugar, but more importantly, its protein structure acts like a hidden scaffolding. It allows the red, white, and blue sections to stay perfectly distinct during the bake.
You get that clean, sharp line between the colors that makes everyone ask if you bought them at a high end bakery. Trust me, once you see how that white center stays bright and doesn't get muddied by the red or blue, you'll never go back to a standard sugar cookie base for decorated treats.
We are going for a texture that is indulgent and sweet, with a crumb that feels almost like shortbread but with more "give." When you take a bite, you should get a slight snap from the edge, followed by a soft, buttery interior that melts away.
It’s the kind of cookie that makes you want to reach for a second one before you've even finished the first. Let's get into the details of why this specific formula creates such a reliable result every single time you fire up the oven.
High Protein Binding: The Greek yogurt provides structural support that prevents the dough from spreading excessively while maintaining a soft, velvety bite.
Fat to Starch Ratio: Softened unsalted butter combined with super fine almond flour creates a short crumb that feels luxurious on the palette.
Cold Set Lamination: Chilling the stacked dough for exactly 90 minutes allows the fats to solidify, ensuring the colors remain sharp and the layers do not merge during the 12 minutes of baking.
Aeration Control: Creaming the butter and sugar for 3 minutes creates micro bubbles that provide a gentle lift without the "cakey" texture of over leavened dough.
| Method | Time | Texture | Best For |
|---|---|---|---|
| Fresh Dough (As Written) | 135 minutes | Velvety, buttery snap | Maximum flavor and clean color lines |
| Pre made Dough Shortcut | 45 minutes | Chewy, greasy | Quick treats where aesthetics matter less |
| Frozen Dough Disc | 180 minutes | Extra crisp edges | Planning ahead for a large summer event |
Using fresh dough is non negotiable if you want those sharp, prismatic lines. Pre made store-bought dough has too much leavening, which causes the colors to "bleed" into each other as the cookie expands. If you're hosting a bigger bash and want a variety, these sit so well next to Cookies and Cream Cookies on a dessert table. The contrast between the bright patriotic colors and the deep cocoa tones is visually stunning.
Essential Recipe Specifications and Visual Checkpoints
| Component | Science Role | Pro Secret |
|---|---|---|
| Almond Flour | Interrupts gluten | Provides a "melt in-your mouth" finish that AP flour alone cannot achieve |
| Greek Yogurt | Acidic stabilizer | Keeps the white layer bright white while providing moisture without extra fat |
| Gel Food Color | Concentrated pigment | Prevents the dough from becoming too wet, which keeps the rocket shape intact |
The super fine almond flour is the ingredient that most people overlook. While all purpose flour provides the strength to hold the popsicle stick, the almond flour adds a richness and a delicate texture. It mimics the way a real popsicle feels as it starts to soften.
Selecting the Finest Elements for Saturated Color
- - All purpose flour (360g)
- Provides the necessary gluten for the stick to stay put.
- - Substitute
- White bread flour (adds more chew, but slightly tougher). Why this? High protein ensures the cookie doesn't crumble off the popsicle stick.
- - Super fine almond flour (50g)
- Softens the crumb and adds a nutty sweetness.
- - Substitute
- Cornstarch (50g). Why this? Breaks up the gluten for a tender, professional grade texture.
- - Unsalted butter (170g)
- Softened to room temperature.
- - Substitute
- Salted butter (omit the extra sea salt). Why this? Provides the indulgent, buttery foundation essential for high end cookies.
- - Granulated sugar (150g)
- Sweetens and helps with the slight edge crisping.
- - Substitute
- Caster sugar. Why this? Standard crystals provide the right amount of aeration during creaming.
- - Plain full fat Greek yogurt (60g)
- Our secret moisture and stability agent.
- - Substitute
- Sour cream (full fat). Why this? Adds tang and structural protein without making the dough greasy.
- - Large egg (1)
- Must be room temperature to emulsify properly.
- - Substitute
- 1/4 cup applesauce (yields a denser cookie). Why this? Binds the fats and liquids for a smooth, cohesive dough.
- - Pure vanilla extract (1 tbsp)
- Use the good stuff here.
- - Substitute
- Vanilla bean paste. Why this? Deepens the flavor profile beyond just "sweet."
- - Almond extract (0.5 tsp)
- The "bakery" scent secret.
- - Substitute
- Lemon extract for a citrus twist. Why this? Enhances the nutty notes of the almond flour.
- - Baking powder (1 tsp)
- Provides just enough lift.
- - Substitute
- 1/4 tsp baking soda + 1/2 tsp cream of tartar. Why this? Ensures the cookies aren't like bricks while keeping them flat.
- - Fine sea salt (0.5 tsp)
- Sharpens all other flavors.
- - Substitute
- Table salt (use slightly less). Why this? Balances the sugar and highlights the butter.
- - Gel food coloring (Red, Blue, White)
- Professional grade vibrancy.
- - Substitute
- Natural beet/spirulina powders (colors will be muted). Why this? Liquid colors will ruin the dough consistency; gel is mandatory.
For something with a bit more salt sweet contrast, you might also like Chocolate Peanut Butter Cookies. It’s a great way to offer different flavor profiles if you’re making a huge spread for a party.
Necessary Kitchen Gear for Sharp Geometric Edges
You don't need a professional bakery kitchen to pull these off, but a few specific tools make the process infinitely easier. A stand mixer, such as a KitchenAid, is your best friend here.
Creaming the butter and sugar for the full 3 minutes requires consistent speed that a hand mixer can struggle to maintain without making your arm go numb.
A bench scraper is another "pro" tool I highly recommend. When you go to slice that chilled tri color block, a bench scraper allows for a perfectly vertical, clean cut. If you use a standard chef's knife, you might find the blade "drags" through the layers, blurring the colors.
The scraper gives you that sharp, iconic popsicle silhouette.
Finally, ensure you have heavy duty parchment paper. These cookies have a decent amount of sugar and fat, and they can be delicate when they first come out of the oven. A good non stick surface ensures you can slide them off the tray without breaking the bottom (blue) layer where the stick is inserted.
Crafting the Iconic Three Tone Summer Silhouette
- Cream the 170g softened unsalted butter and 150g granulated sugar in your stand mixer on medium high. Beat for 3 minutes until pale and fluffy. Note: This creates the aeration needed for a light texture.
- Incorporate the room temperature egg, 60g Greek yogurt, 1 tbsp vanilla, and 0.5 tsp almond extract. Mix until the batter looks silky and smooth.Note: If the egg is cold, the butter might curdle; just keep mixing.
- In a separate bowl, whisk 360g all purpose flour, 50g almond flour, 1 tsp baking powder, and 0.5 tsp sea salt. Gradually add to the wet ingredients at low speed.
- Stop mixing as soon as a stiff dough forms. Divide the dough into three equal portions (about 275g each).
- Tint one portion red and one blue using gel colors. Add white gel to the third to make it pop. Knead the color in by hand to avoid overworking the gluten.
- Roll each color into a rectangle of equal size (roughly 1cm thick). Stack them: Red on top, white in the middle, blue on the bottom.
- Wrap the block tightly in plastic wrap. Chill in the refrigerator for 90 minutes. Note: This is the most important step for structural stability.
- Preheat your oven to 175°C (350°F). Slice the chilled block into 20 vertical rectangles.
- Insert a popsicle stick halfway into the blue end of each cookie. Crimp the top and middle with a cold fork to create ridges.
- Bake on parchment for 12 minutes until the edges are set and just barely starting to turn golden.
| Fresh Dough | Shortcut Dough |
|---|---|
| Color: Vibrant, distinct layers | Color: Muted, colors often bleed |
| Texture: Soft, velvety bite | Texture: Greasy or overly crispy |
| Stability: Holds the stick perfectly | Texture: Stick often falls out |
Fixing Common Decorative Baking and Shaping Hurdles
Preventing Prismatic Color Bleeding
One of the biggest frustrations is seeing those crisp red and white lines turn into a blurry pink mess. This usually happens for two reasons: the dough was too warm when it hit the oven, or you used liquid food coloring.
Liquid coloring adds unnecessary moisture that turns the dough into a "batter" consistency as it heats up.
If you notice bleeding, try putting your sliced cookies (with the sticks already in) back in the freezer for 10 minutes before baking. This "shocks" the butter, ensuring it doesn't melt faster than the flour can set the structure.
| Problem | Root Cause | Solution |
|---|---|---|
| Stick falls out | Inserted too shallow or dough too warm | Push stick 3cm deep; chill dough before inserting |
| Browned edges | Oven temp too high or baked too long | Calibrate oven; pull at 12 minutes exactly |
| Cracked surface | Overmixed dough or too much flour | Mix until just combined; weigh flour in grams |
Securing the Wooden Stick Anchor
Getting the popsicle stick to stay inside the cookie during the bake can be tricky. If you just lay the cookie on top of the stick, it won't bond. You need to actually "thread" the stick into the center of the dough.
The Greek yogurt in this recipe makes the dough pliable enough to do this without the whole thing splitting.
Chef's Tip: Dip the tip of the popsicle stick in a little bit of leftover egg white before sliding it into the dough. The protein acts as a natural glue that hardens during the bake, locking the stick into the cookie forever.
Managing Brittle or Dry Dough
If your dough feels like it's crumbling when you try to roll it out, it's likely a hydration issue. This can happen if you used a measuring cup for the flour instead of a scale. To fix it, don't add water! Water will make the cookie tough. Instead, knead in one extra teaspoon of Greek yogurt.
The fat and acid will help the dough come back together without activating the gluten aggressively.
Common Mistakes Checklist: - ✓ Always weigh your flour (360g) to prevent dry, crumbly cookies. - ✓ Use "Super Fine" almond flour to avoid a gritty mouthfeel. - ✓ Never skip the 90 minute chill; it's the difference between a popsicle and a blob.
- ✓ Crimp with a fork dipped in flour so it doesn't stick to the dough. - ✓ Let the cookies cool completely on the tray before moving them - the stick needs time to set.
Adjusting for Large Summer Party Crowds
If you are hosting the whole neighborhood, you might need to double this recipe. When doubling, the most important thing is to manage your mixer's capacity. A standard 5 quart mixer can handle a double batch of this dough, but don't try to go to 4x at once.
You'll end up with unmixed flour at the bottom and over creamed butter at the top.
When scaling up, I recommend making separate batches of the dough colors. It’s much easier to manage three separate bowls of dough than one giant mountain of tri color dough. Also, remember that baking two trays at once can lower your oven temperature.
If you have two trays in, increase your bake time by about 2 minutes and swap the tray positions halfway through to ensure an even "set" on the edges.
For a half batch, you'll need to beat one egg and use exactly half of it by weight (about 25g). Using a whole egg in a half batch will make the dough too wet, and your Bomb Pop Cookies will lose those beautiful sharp edges we worked so hard for.
Debunking Common Sugar Cookie Misconceptions
There is a pervasive myth that sugar cookies must be chilled overnight to be good. While some doughs benefit from a long rest to develop flavor, this specific recipe is designed for a 90 minute chill.
Resting it too long can actually cause the almond flour to absorb too much moisture, making the cookies denser than we want. 90 minutes is the "sweet spot" for structural snap and color separation.
Another myth is that you need "special" flour for professional results. You'll often hear that cake flour is better for cookies, but for these rocket pop shapes, cake flour is actually a disadvantage. It has too little protein, meaning your cookies won't be strong enough to hold onto the stick.
Standard all purpose flour is exactly what provides the "backbone" for this festive design.
Inclusive Dietary Swaps for Every Picnic Guest
| Original Ingredient | Substitute | Why It Works |
|---|---|---|
| Butter (170g) | Vegan Butter Sticks (170g) | High fat content maintains the short crumb. Note: Ensure it is the "stick" variety, not the tub. |
| Greek Yogurt (60g) | Coconut Yogurt (Full fat) | Similar acidity and thickness. Note: Adds a subtle tropical flavor. |
| Egg (1 large) | Flax Egg (1 tbsp meal + 3 tbsp water) | Provides binding. Note: Results in a slightly nuttier, darker white layer. |
Making these plant based is actually quite simple. The most important thing is choosing a high-quality vegan butter that doesn't have a high water content. If the butter substitute melts too quickly, the red and blue will run together.
I’ve had great success with cashew based butters for this specific recipe because they have a creamy, indulgent fat profile that mimics dairy beautifully.
For a gluten-free version, use a 1:1 gluten-free baking blend that contains xanthan gum. You still want to keep the almond flour in there! The combination of the GF blend and the almond flour actually makes for a very convincing texture that most guests won't even realize is gluten-free.
Preserving That Freshly Baked Snap and Texture
Storage: These cookies are at their absolute peak about 2 hours after baking, once they've fully set but are still fresh. You can store them in an airtight container at room temperature for up to 5 days.
If you find they are softening too much in the summer humidity, throw a single piece of white bread into the container. The bread will absorb the moisture, keeping the cookies snap fresh.
Freezing: You can freeze the baked cookies for up to 2 months. To prevent the sticks from snapping, lay them flat in a single layer in a freezer bag. When you're ready to eat, let them thaw at room temperature for 30 minutes. Don't microwave them!
It will ruin the velvety crumb we worked so hard to achieve.
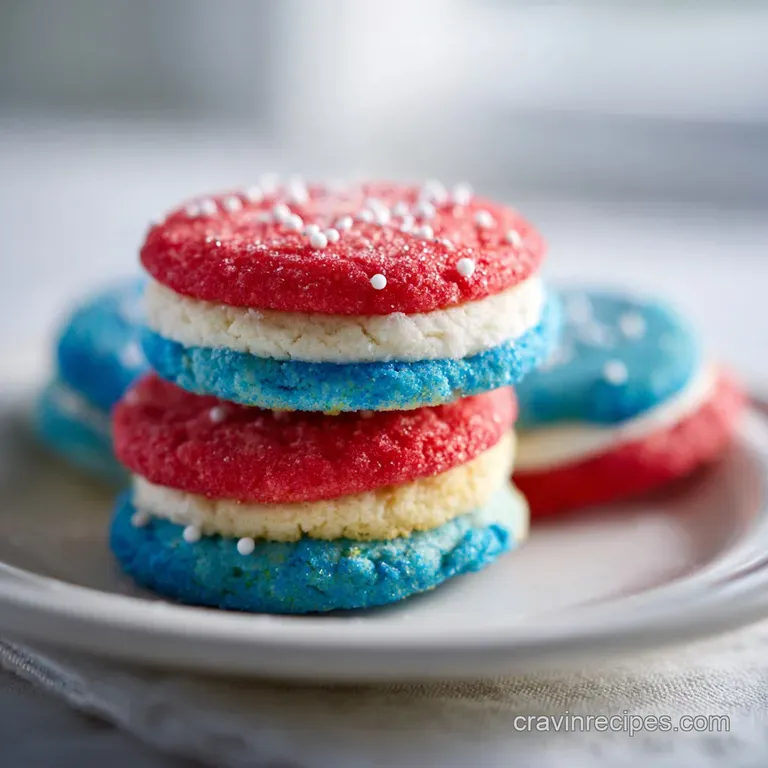
Zero Waste Tip: You will inevitably have some trimmings after squaring off your dough blocks. Don't throw those away! Roll the red, white, and blue scraps together into a "galaxy" or "marble" log. Slice them into round cookies and bake them alongside the popsicles.
They look like little prismatic planets and taste just as delicious.
Flavorful Accompaniments for Your Festive Dessert Platter
These cookies are the star of the show, but pairing them correctly makes the whole experience feel like a curated event. I love serving these with a side of Vanilla Bean Frozen Yogurt.
The tartness of the yogurt in the cookies mirrors the flavor of the frozen yogurt, creating a cohesive dessert experience.
If you want to lean into the summer theme, a Summer Fruit Carpaccio—thinly sliced strawberries and blueberries with a lime mint glaze adds a fresh, acidic contrast to the buttery cookies.
The acidity cleanses the palate between bites of the sweet dough, making every mouthful feel like the first one.
Chef's Note: For an adult version of this dessert spread, serve these cookies alongside a chilled glass of Prosecco. The bubbles and the acidity of the wine cut through the butteriness of the almond flour in a way that is incredibly sophisticated yet fun.
These cookies are about more than just the 4th of July; they are about capturing that feeling of the ice cream truck turning the corner on a hot July afternoon. They are indulgent, sweet, and exactly what a summer treat should be.
By focusing on the "flavor layers" from the tangy yogurt to the aromatic almond and the rich butter you're creating a memory that tastes as good as it looks. Now, go grab your gel colors and let's get baking!

Recipe FAQs
Is it necessary to chill the dough for 90 minutes?
Yes, chilling is mandatory for structural stability. If you skip this, the layers will bleed into each other and lose their sharp definition during the bake.
How to ensure the red, white, and blue colors remain distinct?
Stack your rolled dough slabs tightly and wrap them securely in plastic wrap before the long chill. If you enjoyed mastering this color layering technique here, you can apply similar precision logic to our soft and chewy chocolate chip cookies to ensure consistent texture throughout the batch.
Why is Greek yogurt included in the dough?
It provides essential protein scaffolding to keep the cookies from spreading. The yogurt also balances the sweetness and ensures the dough remains cohesive enough to hold the popsicle stick.
How to create the iconic popsicle ridges?
Use a cold fork to gently crimp the top and middle layers after inserting the popsicle stick. Ensuring your fork is chilled prevents it from sticking to the dough and smearing the colors.
Can I store the dough before baking?
Yes, you can prepare the tri-color dough block up to 3 days in advance. Simply keep it tightly wrapped in the refrigerator until you are ready to slice and bake.
Is it true that I should bake these until they are golden brown?
No, this is a common misconception. You should pull them from the oven at the 12-minute mark, even if the edges look just set, to maintain the soft interior and vibrant color.
How to achieve the best crumb texture?
Cream the softened butter and sugar for at least 3 minutes until pale and fluffy. This aeration process is what gives the finished cookie its professional, velvety crumb.
Bomb Pop Cookies

Ingredients:
Instructions:
Nutrition Facts:
| Calories | 178 kcal |
|---|---|
| Protein | 3.0 g |
| Fat | 8.7 g |
| Carbs | 21.9 g |
| Fiber | 0.6 g |
| Sugar | 7.5 g |
| Sodium | 65 mg |
