Cookie Monster Cookies Recipe
- Time: Active 20 minutes, Passive 72 minutes, Total 92 minutes
- Flavor/Texture Hook: Fudgy blue centers with a crunchy Oreo shatter
- Perfect for: Birthday parties, weekend baking, or satisfying a serious sweet tooth
- Mastering the Fudgy Cookie Monster Cookies
- Why These Cookies Stay Fudgy
- Important Baking Specs and Metrics
- Deep Dive Into Sweet Ingredients
- Essential Tools for Your Kitchen
- The Step by Step Method
- Fixing Your Baking Mistakes Quickly
- Easy Swaps and Flavor Twists
- Storage and Freshness Tips
- Best Ways to Serve Treats
- Flavor Contrast Map
- Kitchen Myths Debunked
- Recipe FAQs
- 📝 Recipe Card
Mastering the Fudgy Cookie Monster Cookies
I still remember the first time I tried making a batch of blue treats for a friend's baby shower. I used liquid food coloring from the grocery store, and the result was... well, let's just say they looked more like swamp monsters than the friendly character we all know and love.
They were flat, greasy, and a depressing shade of murky teal. It was a total bake fail that left me scrubbing blue stains off my white quartz counters for an hour.
But I'm not one to give up on a dessert, especially when chocolate and Oreos are involved. I went back to the kitchen, swapped my techniques, and realized that these Cookie Monster Cookies require a bit of science and a lot of butter.
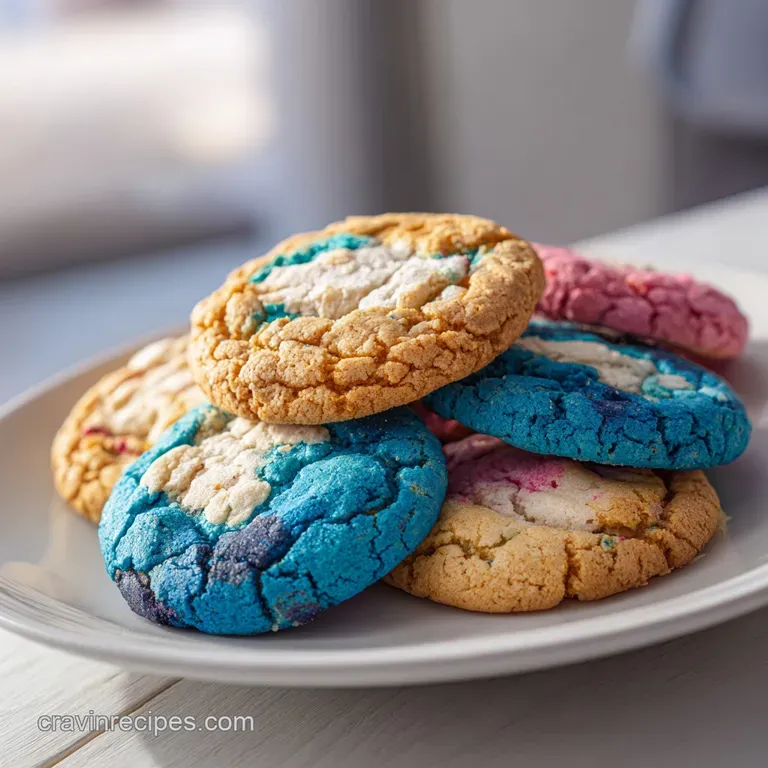
The trick isn't just the color; it's the contrast between the velvety blue dough and the massive chunks of white and semi sweet chocolate. When you pull these out of the oven, the aroma of toasted sugar and cocoa hits you immediately, and the vibrant blue stays exactly as bright as when it went in.
Trust me on this one: don't settle for those flat, store-bought looking things. We want these to be thick, indulgent, and slightly gooey in the center. We're going for a texture that feels like a cross between a brownie and a traditional cookie.
Whether you're making these for a kid's party or just because you're a self proclaimed cookie monster yourself, this recipe is the foolproof way to get that bakery style finish every single time.
Why These Cookies Stay Fudgy
Gluten Suppression: Adding cornstarch to the all purpose flour weakens the protein structure, ensuring the cookies stay soft and velvety rather than becoming bread like or tough.
Lecithin Emulsification: The extra egg yolk provides additional fat and lecithin, which binds the moisture and fats together for a denser, more indulgent crumb that resists drying out.
Sugar Ratio Balance: A higher concentration of brown sugar compared to cane sugar adds molasses, which attracts moisture and creates that iconic chewy, fudgy center we crave.
Chef's Tip: Grate your butter with a box grater if you forgot to take it out of the fridge. Those small shreds will reach room temperature in 10 minutes, saving you from a microwave disaster.
Important Baking Specs and Metrics
Before we get our hands blue, let's look at the mechanical differences between a rushed version and the classic method we are using today. It's the difference between a "sad puddle" and a "perfect puck."
| Method | Prep Time | Texture Result | Color Vibrancy |
|---|---|---|---|
| Fast Method | 10 minutes | Flat and greasy | Fades to green/teal |
| Classic (This Recipe) | 20 minutes | Thick and fudgy | Electric blue |
| Bakery Style | 24 hours | Very dense | Deep navy/royal blue |
While you might be tempted to skip the chilling phase, that rest time is what allows the flour to fully hydrate. If you skip it, the cookies will spread too much, and your candy eyes will slide right off the edges.
For the best results, aim for these numeric checkpoints: keep your oven at exactly 180°C, scoop dough balls that weigh approximately 100g each, and let them rest on the hot pan for exactly 10 minutes after baking to "set" the bottom.
Deep Dive Into Sweet Ingredients
Choosing the right components is the secret to making these more than just a novelty. We need high-quality fats and specific dyes to ensure the flavor matches the fun look.
| Ingredient | Science Role | Pro Secret |
|---|---|---|
| Unsalted Butter | Provides fat for flavor and structure | Use a brand with high fat content for a richer mouthfeel |
| Royal Blue Gel | Concentrated pigment without adding water | Gel doesn't alter the pH, so the dough stays blue, not green |
| Cornstarch | Softens flour proteins | Sift it with the flour to prevent "chalky" pockets in the dough |
| Light Brown Sugar | Adds moisture and chew | Pack it tightly in the cup to ensure the molasses ratio is correct |
For the mix ins, I always suggest a high-quality white chocolate chip. Some cheaper brands are mostly oil and sugar, but a good white chocolate adds a creamy, velvety contrast to the dark Oreo pieces. If you're a fan of deep flavors, you might even enjoy the profile found in our Cookies and Cream recipe which uses a similar chocolate heavy base.
Essential Ingredient List: - 225g unsalted butter, room temperature Why this? Provides the foundational richness and helps the cookies spread just enough. - 150g cane sugar - 100g light brown sugar, packed - 1 large egg - 1 large egg yolk Why
this? The extra fat from the yolk creates a fudgy, dense texture. - 2 tsp royal blue gel food coloring - 375g all purpose flour - 10g cornstarch - 1 tsp baking soda - 1 tsp sea salt - 113g Oreo cookies, roughly chopped Why this? Adds a dark cocoa crunch that contrasts the sweet
blue dough. - 175g white chocolate chips - 90g semi sweet chocolate chips - 48 candy eyes
Essential Tools for Your Kitchen
You don't need a professional bakery setup, but a few specific tools will make your life much easier. First, a stand mixer (like a KitchenAid) is a lifesaver for getting the blue dye evenly incorporated without staining your hands. If you're using a hand mixer, wear gloves when you start folding in the mix ins!
A large cookie scoop (about 3 tablespoons in size) is also non negotiable if you want uniform cookies that bake at the same rate. Finally, make sure you have heavy duty baking sheets. Thin pans can warp in the 180°C oven and cause the bottoms of your cookies to burn before the centers are set.
Use parchment paper or a silicone mat to prevent sticking and to keep the blue dye from potentially staining your pans.
The step-by-step Method
Right then, let's get into the fun part. Follow these steps closely to ensure your dough doesn't turn into a crumbly mess.
- Cream the butter. Beat 225g butter with 150g cane sugar and 100g brown sugar until pale and fluffy. Note: This incorporates air for a slight lift.
- Add the eggs. Mix in 1 large egg and 1 large egg yolk.
- Tint the base. Incorporate 2 tsp royal blue gel coloring. Note: Gel is stronger than liquid; start with 1 tsp and add more if needed.
- Whisk dry ingredients. Combine 375g flour, 10g cornstarch, 1 tsp baking soda, and 1 tsp sea salt in a separate bowl.
- Merge the mixtures. Slowly add the dry ingredients to the blue butter mixture until just combined.
- Fold the mix ins. Gently stir in 113g chopped Oreos, 175g white chocolate chips, and 90g semi sweet chips.
- Chill the dough. Refrigerate for at least 30 minutes. Note: This prevents excessive spreading and deepens the flavor.
- Preheat and prep. Set your oven to 180°C (350°F) and line your trays.
- Scoop and shape. Form 24 large balls and place them on the tray, leaving space between each.
- Bake and decorate. Bake for 10-12 minutes until edges are set and centers look slightly underdone. Press the candy eyes into the warm cookies immediately after taking them out.
If you love the texture of this dough, you'll find it quite similar to the technique used in my Soft and Chewy recipe. The key is that "slightly underdone" center which carries over as they cool on the pan.
Fixing Your Baking Mistakes Quickly
Even the best of us have bad bake days. If your cookies aren't looking quite right, don't panic. Most issues with Monster Cookies come down to temperature or dye type.
Why Your Dough Turned Green
This is the most common heartbreak. Since egg yolks are yellow and butter is often pale yellow, adding blue dye can result in a swampy green. To fix this, you need a high-quality "Royal Blue" or "Electric Blue" gel.
If the dough looks green before baking, add a tiny drop of violet gel; the purple tones will neutralize the yellow/green and pull it back to a true blue.
Why Your Candy Eyes Melted
If you put the candy eyes on before baking, they will melt into terrifying sugar puddles. The heat of the oven destroys the detail. Always wait until the cookies are out of the oven. You have about a 2 minute window while the cookies are molten and soft to gently press the eyes in.
| Problem | Root Cause | Solution |
|---|---|---|
| Flat Cookies | Butter was too melted | Chill dough for 60 mins instead of 30 |
| Dry Crumbly Texture | Too much flour | Weigh your flour (375g) instead of using measuring cups |
| Dull Blue Color | Used liquid food dye | Use professional gel colors like Americolor or Wilton |
Common Mistakes Checklist: - ✓ Always use room temperature eggs so they emulsify properly with the butter. - ✓ Do not over beat the dough after adding flour; this prevents a "tough" cookie.
- ✓ Check your oven temperature with a separate thermometer to ensure it's truly 180°C. - ✓ Let the cookies cool completely on the pan to allow the fudgy center to set. - ✓ Use "gel" coloring only liquid dye adds too much moisture and ruins the texture.
Easy Swaps and Flavor Twists
Sometimes you don't have every single chocolate chip in the pantry, or you want to experiment with a different vibe. Here is how you can pivot without ruining the bake.
| Original Ingredient | Substitute | Why It Works |
|---|---|---|
| Cane Sugar | Granulated White Sugar | Same sweetness; slightly less "toasty" than cane sugar. |
| White Chocolate Chips | Macadamia Nuts | Adds a similar buttery crunch. Note: Less sweet than chips. |
| Oreos | Chocolate Sandwich Cookies | Generic brands work fine as long as they are crunchy and dark. |
If you're looking for a completely different flavor profile that still uses that rich, buttery base, you might want to try a Peanut Butter Balls recipe for your next party.
If you want a crunchier cookie, bake them for an extra 3 minutes and skip the cornstarch. If you want them ultra fudgy, pull them out as soon as the edges look matte, even if the centers look like raw dough.
Finally, if you want a darker blue, add a teaspoon of dark cocoa powder to the dough it will mute the brightness but give it a sophisticated, "midnight" look.
Storage and Freshness Tips
These cookies are best eaten within the first 48 hours when the Oreo pieces still have that distinct shatter and the centers are at their peak fudginess. Store them in an airtight container at room temperature.
If they start to get a little firm, pop one in the microwave for 8 seconds to revive that "fresh from the oven" feel.
For zero waste, take any broken Oreo pieces or the "dust" from the bottom of the cookie bag and fold it into vanilla ice cream. You can also freeze the raw dough balls for up to 3 months. Just bake them directly from frozen, adding an extra 2 minutes to the total bake time.
Best Ways to Serve Treats
Serving these is all about the "wow" factor. Since they are so vibrant, they look incredible on a simple white platter. I love serving them with a cold glass of whole milk the classic "milk dunk" is essential here.
The fats in the milk help cut through the intense sweetness of the white chocolate and the richness of the butter.
For a real showstopper, try making a Monster Ice Cream Sandwich. Take two cooled cookies, put a massive scoop of cookies and cream ice cream in the middle, and roll the edges in mini chocolate chips. It's a sugar rush, sure, but it's the kind of dessert people talk about for weeks!
Flavor Contrast Map
- Indulgent Sweetness: White chocolate chips and brown sugar base.
- Rich Cocoa Depth: Roughly chopped Oreo pieces and semi sweet chips.
- Salty Balance: Sea salt and high fat unsalted butter.
- Textural Play: Fudgy blue dough versus the "shatter" of the cookie chunks.
Kitchen Myths Debunked
One big misconception is that "food coloring changes the taste of the cookie." While this can be true for cheap liquid dyes that have a bitter aftertaste, high-quality gel colors are flavorless in the amounts used here. Another myth is that you can't over cream butter and sugar.
Actually, if you beat them for too long, you'll incorporate too much air, causing the cookies to puff up and then collapse into a wrinkled mess. Stick to 2-3 minutes max!

Recipe FAQs
What are Cookie Monster cookies?
They are vibrant blue, oversized cookies loaded with chocolate chips and crumbled cookies. The signature look comes from heavy use of blue gel food coloring, aiming to mimic the Muppet's fur color and often featuring candy eyes.
What are Cookie Monster's cookies made of?
They combine a high fat, fudgy dough base with white chocolate chips, semi sweet chips, and chopped chocolate sandwich cookies (like Oreos). The distinctive texture relies on cornstarch to keep the center velvety soft against the crunchy inclusions.
Why does Cookie Monster not eat cookies anymore?
No, the character still loves cookies, though recent media sometimes focuses on healthier alternatives. In the context of this recipe, the cookies are designed to be extremely rich, satisfying the fictional character's legendary appetite for sweets.
Is Cookie Monster a permanent flavor at Baskin Robbins?
No, the Baskin Robbins flavor is typically a limited time promotion, not a permanent menu fixture. It generally features a blue vanilla ice cream base with chocolate chunks and cookie dough pieces, similar in spirit to this bake.
How do I prevent my Cookie Monster dough from turning green?
Use high-quality gel food coloring, not liquid dye, and ensure your butter/eggs are not overly yellow. Liquid dyes introduce too much moisture and their acidity can react poorly with the egg yolks, but professional gels bypass this issue entirely.
How to achieve the thick, non-spreading shape seen in bakery versions?
Chill the scooped dough balls for at least 60 minutes before baking, and use a higher ratio of brown sugar. Chilling solidifies the fat, slowing spread, and mastering this temperature control technique is key to texture; if you enjoyed mastering it here, see how the same principle works when creating a stable emulsion in our Chocolate Covered Pretzels recipe.
What is the best way to get a shiny, perfectly crisp Oreo crust contrast in this cookie?
Ensure your chocolate sandwich cookies are chopped coarsely, not pulverized into dust, and use room temperature butter for creaming. A dry mix is bad, but too much liquid fat causes a greasy spread that drowns the cookie pieces; if you want a perfectly crisp, buttery base for other desserts, review the technique in the Oreo Pie Crust recipe.
Cookie Monster Cookies Recipe

Ingredients:
Instructions:
Nutrition Facts:
| Calories | 258 kcal |
|---|---|
| Protein | 2.9g |
| Fat | 12.6g |
| Carbs | 33.8g |
| Fiber | 0.8g |
| Sugar | 21.6g |
| Sodium | 188mg |
