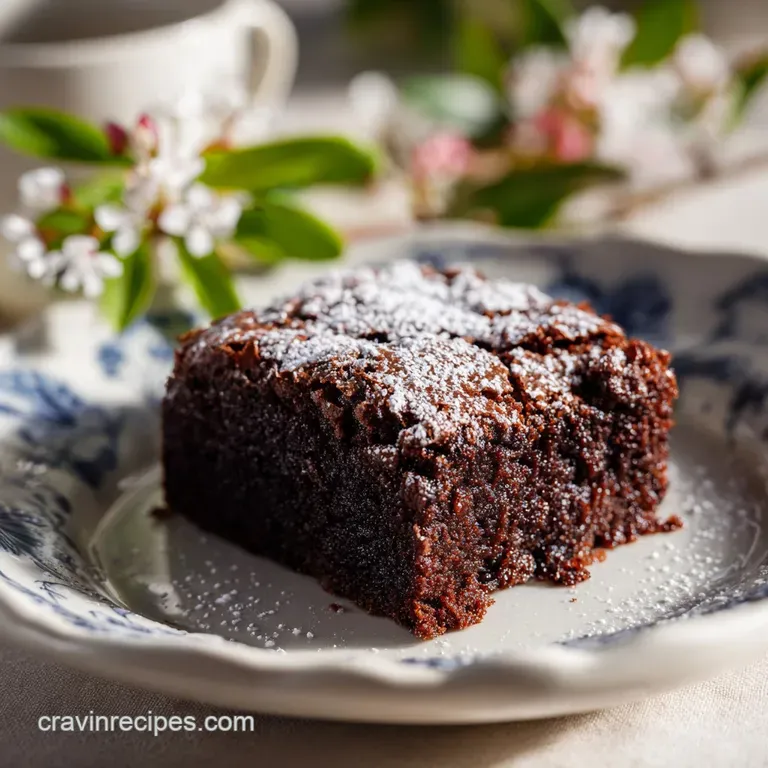
Gluten Free Dessert Recipe with Chocolate: Fudgy Brownies
- Time: Active 15 minutes, Passive 25 minutes, Total 40 minutes
- Flavor/Texture Hook: Intense mahogany chocolate with a velvety, melt in-the mouth crumb
- Perfect for: Decadent dinner parties, gluten sensitive birthdays, or late night cravings
- The Ultimate Gluten Free Dessert Recipe with Chocolate for Brownie Lovers
- The Chemistry of the Meringue Like Crackle
- Ingredient Deep Dive and Science Roles
- High Quality Elements for This Gluten Free Dessert
- Essential Tools for a Silky Smooth Batter
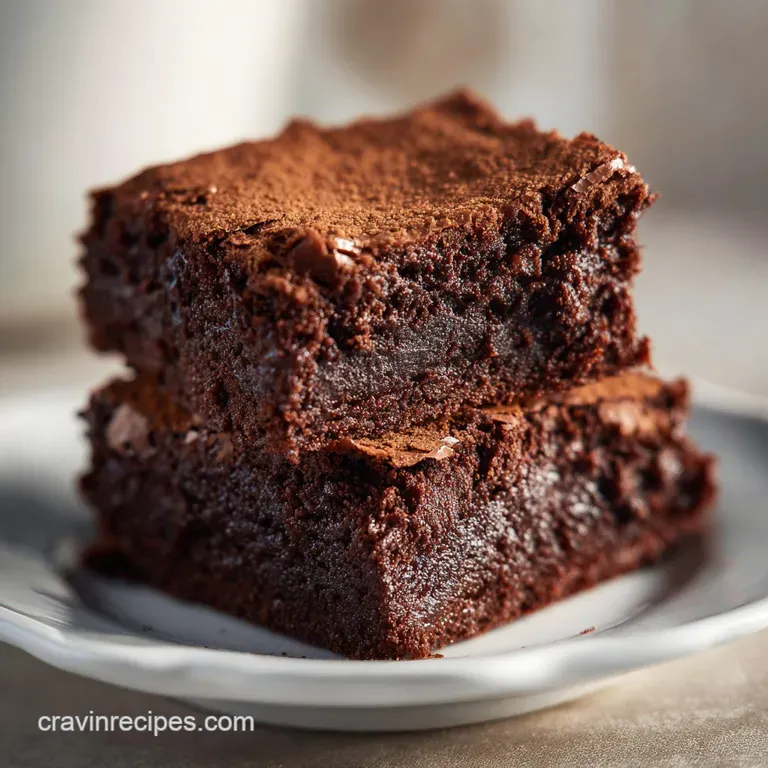
- Step by Step Guide to a Shatteringly Crisp Top
- Fixing Texture Flaws in Your Chocolate Bake
- Adapting Your Recipe for Different Dietary Needs
- Debunking Dessert Misconceptions
- Keeping Your Chocolate Treats Fudgy and Fresh
- Complementary Flavors for Your Decadent Chocolate Creation
- Recipe FAQs
- 📝 Recipe Card
The Ultimate gluten-free Dessert Recipe with Chocolate for Brownie Lovers
We’ve all been there biting into a gluten-free treat only to find it has the structural integrity of a dry sponge and the flavor of sweetened cardboard. It’s frustrating because when you want a "real" dessert, you shouldn't have to compromise on that deep, cocoa heavy satisfaction.
I spent months in my kitchen tossing out batches of brownies that were either too oily or crumbly enough to require a vacuum cleaner, but I finally cracked the code with this specific method.
The secret isn't just about replacing the flour; it's about how you treat the fats and the air. By ditching the heavy blends and sticking to almond flour and starch, we create a texture that isn't trying to mimic wheat but actually surpasses it in richness.
This gluten-free Dessert Recipe with Chocolate relies on a specific "ribbon stage" for the eggs that creates a structural meringue like top, shielding the gooey center from drying out in the heat of the oven.
Trust me, once you see those first tiny cracks forming on the surface as the tray sits in the oven, you'll know you've hit the jackpot. This isn't just a "good for being gluten-free" recipe; it's a "better than the original" masterpiece.
It's the kind of dish that makes people stop talking the moment they take a bite, focusing entirely on that intense, dark chocolate hit.
The Chemistry of the Meringue Like Crackle
Sugar Migration: When you whisk the eggs and sugars for a full five minutes, the sugar dissolves into the egg proteins, creating a stable foam that rises to the surface during baking.
This thin layer dehydrates in the oven's dry heat, forming that iconic, shatter thin crust that defines a world class brownie.
- Lipid Starch Synergy: The combination of almond flour fats and tapioca starch creates a flexible matrix that holds moisture far longer than traditional wheat flour.
- Density Control: Using Dutch processed cocoa raises the pH level, neutralizing acidity for a smoother, darker flavor without the grainy bite of natural cocoa.
- Emulsion Stability: Avocado oil acts as a secondary liquid fat, ensuring the chocolate doesn't "seize" or become chalky as it cools to room temperature.
- Protein Structure: The three large eggs provide the necessary scaffolding that gluten usually offers, preventing the dessert from collapsing into a puddle of oil.
| Target Outcome | Internal Temp | Rest Time | Visual Cue |
|---|---|---|---|
| Molten/Gooey | 85°C | 30 minutes | Center jiggles slightly when shaken |
| Fudgy/Dense | 90°C | 1 hours | Edges pull away, center is firm |
| Cake like | 95°C | 15 minutes | Toothpick comes out with dry crumbs |
This table helps you decide exactly when to pull your tray out depending on your personal texture preference. I usually aim for the 85°C mark because carryover cooking will do the rest while it sits on the counter.
Ingredient Deep Dive and Science Roles
Understanding what each component does in the bowl is the difference between a lucky bake and a consistent one. We aren't just throwing things together; we are building a flavor profile that starts with fat and ends with a salt spiked finish.
| Ingredient | Science Role | Pro Secret |
|---|---|---|
| 70% Dark Chocolate | Primary Fat & Structure | Use bar chocolate, not chips; chips contain stabilizers that prevent a smooth melt. |
| Almond Flour | Moisture Reservoir | Superfine blanched flour prevents a gritty "sand" texture in the final crumb. |
| Tapioca Starch | Binding Agent | This provides the "chew" that gluten-free bakes often lack. |
| Espresso Powder | Flavor Catalyst | It doesn't make it taste like coffee; it intensifies the cacao notes. |
If you love the way these ingredients work together, you'll definitely appreciate the technique in this gluten-free Dessert recipe which uses a similar almond heavy base for a different format.
high-quality Elements for This gluten-free Dessert
- 225g 70% dark chocolate, chopped: Why this? Provides the foundational "snap" and rich fat content for the fudgy center. (Sub: Semi sweet chocolate, but reduce white sugar by 20g)
- 115g unsalted butter, cubed: Why this? Adds the necessary dairy solids for a velvety mouthfeel. (Sub: Vegan butter sticks with high fat content)
- 20g neutral avocado oil: Why this? Stays liquid at room temperature, keeping the cake moist for days. (Sub: Melted coconut oil)
- 200g granulated white sugar: Why this? Essential for creating the crackly top crust through crystallization. (Sub: Extra brown sugar, but the top will be duller)
- 100g packed light brown sugar: Why this? Adds molasses notes and hygroscopic moisture. (Sub: Coconut sugar for a more toasted flavor)
- 3 large eggs, room temperature: Why this? Cold eggs will seize the melted chocolate; room temp is non negotiable. (Sub: Flax eggs, though the rise will be significantly less)
- 10ml pure vanilla extract: Why this? Rounds out the bitterness of the dark chocolate. (Sub: Vanilla bean paste)
- 95g superfine blanched almond flour: Why this? Offers protein and healthy fats without a heavy "nutty" taste. (Sub: Oat flour, but it will be slightly more absorbent/dry)
- 40g tapioca starch: Why this? Gives the dessert its characteristic "stretch" and chewiness. (Sub: Cornstarch or Arrowroot powder)
- 30g Dutch processed cocoa powder: Why this? Higher pH means a deeper color and less acidity. (Sub: Natural cocoa powder, but add a pinch of baking soda)
- 5g sea salt: Why this? Cuts through the sugar to highlight the chocolate's complexity. (Sub: Standard table salt, but use only 3g)
- 2g espresso powder: Why this? An "amplifier" for chocolate that deepens the mahogany hue. (Sub: Instant coffee granules)
Essential Tools for a Silky Smooth Batter
You don't need a professional kitchen, but a few specific items make this gluten-free Dessert Recipe with Chocolate much easier to handle. First, a heavy bottomed saucepan is better than a microwave for melting the chocolate; it gives you total control over the heat so nothing Scorches.
I also highly recommend a stand mixer or a powerful hand mixer. Whisking the eggs to the "ribbon stage" by hand is a workout that most people (myself included) give up on far too early.
A digital scale is your best friend here. In gluten-free baking, being off by just 10 grams of flour can turn a fudgy dream into a dry brick. Finally, grab some parchment paper. This batter is incredibly gooey, and trying to pry it out of a greased pan without a parchment "sling" is a recipe for heartbreak.
step-by-step Guide to a Shatteringly Crisp Top
- Prep the oven. Preheat to 180°C and line a 20x20cm square pan with parchment paper, leaving an overhang on the sides. Note: The overhang allows you to lift the entire block out once cooled.
- Melt the base. In a small saucepan over low heat, combine 225g chopped chocolate, 115g butter, and 20g avocado oil until smooth and glossy.
- Whip the eggs. In a large bowl, beat 3 eggs, 200g white sugar, 100g brown sugar, and 10ml vanilla for 5 minutes until the mixture is pale, thick, and falls in ribbons.
- Combine fats. Slowly pour the warm chocolate mixture into the egg mixture while whisking on low. Note: This tempers the eggs so they don't scramble.
- Sift dry goods. Sift 95g almond flour, 40g tapioca starch, 30g cocoa, 5g salt, and 2g espresso powder over the wet ingredients.
- Fold gently. Use a spatula to fold the dry ingredients in until no streaks of white remain. Don't overmix, or you'll deflate the air you just whipped in.
- Transfer batter. Pour into the prepared pan and smooth the top with your spatula.
- The Bake. Place in the center of the oven for 25 minutes until the edges are set but the center still has a slight wobble.
- The Cooling. Let the pan sit on a wire rack for at least 30 minutes. Note: The structure sets as it cools; cutting too early results in a mess.
- Final Slice. Lift the parchment sling out and cut into 16 squares using a sharp, warm knife.
Chef's Tip: For the cleanest cuts, wipe your knife blade with a damp cloth between every single slice. It prevents the fudgy center from sticking and tearing the crackly top.
Fixing Texture Flaws in Your Chocolate Bake
Why Your Brownies Are Gritty
If you notice a "sandy" feel on the tongue, it’s usually because the almond flour wasn't fine enough or the sugar didn't dissolve properly during the egg whipping stage. Always look for "superfine blanched" almond flour rather than almond meal, which contains the skins and a coarser grind.
Why the Top Is Dull and Matte
The shiny, crackly top is a result of dissolved sugar. If you didn't beat the eggs and sugar long enough, the sugar won't migrate to the top to form that crust. It’s also possible the butter was too cold when added, preventing the sugar from fully integrating into the fat.
| Problem | Root Cause | Solution |
|---|---|---|
| Greasy surface | Emulsion broke during mixing | Ensure melted chocolate is warm, not hot, when adding to eggs. |
| Crumbly texture | Too much almond flour | Use a digital scale to ensure exactly 95g of flour. |
| Sunken center | Underbaked or too much air | Check internal temp (85°C) and don't over whip once flour is added. |
For those who want to experiment with different formats, this Chocolate Swirl Loaf recipe offers a great comparison on how sugar affects the crust in a loaf versus a square bake.
Common Mistakes Checklist:
- ✓ Using cold eggs (this causes the melted butter and chocolate to clump instantly).
- ✓ Skipping the sifting step (cocoa powder is notorious for stubborn, bitter lumps).
- ✓ Over baking (even 3 extra minutes can turn these from fudgy to dry).
- ✓ Cutting while hot (the internal structure needs time to bond).
- ✓ Using "natural" cocoa instead of Dutch processed (affects the moisture and color).
Adapting Your Recipe for Different Dietary Needs
Scaling this recipe requires a bit of math because of the egg ratios. If you want to cut the recipe in half for a tiny 10x10cm pan, you'll need 1.5 eggs. The best way to do this is to crack two eggs into a bowl, whisk them together, and then weigh out exactly half by grams.
When doubling the recipe for a large party, use a 23x33cm pan. You’ll want to increase the salt and espresso powder to only 1.5x the original amount to avoid overpowering the chocolate, but you can safely double all other ingredients.
Keep an eye on the bake time it usually requires an extra 10 minutes when doubled in a single large pan.
| Method | Time | Texture | Best For |
|---|---|---|---|
| Oven (Standard) | 25 minutes | Crackly top, fudgy center | The classic experience |
| Stovetop (Steamed) | 40 minutes | Uniformly molten, no crust | A "potted" pudding style |
| Air Fryer | 18 minutes | Extra crispy edges | Small batches/quick fix |
If you are looking for a more cake like experience rather than a fudgy brownie, you might prefer this Chocolate Cupcakes with Chocolate recipe, which uses a different leavening technique to get that airy lift.
Debunking Dessert Misconceptions
One major myth is that gluten-free desserts are "healthier" by default. This gluten-free Dessert Recipe with Chocolate is an indulgent treat it has plenty of sugar and fat, which is exactly why it tastes so good.
The absence of gluten doesn't mean it's low calorie; it just means the structure comes from eggs and nuts instead of wheat.
Another common mistake is thinking that dark chocolate is always bitter. When paired with the right amount of salt and vanilla, 70% dark chocolate actually tastes creamy and fruity.
The salt suppresses the bitter receptors on your tongue, allowing the "sweet" and "cocoa" notes to shine through much more clearly than they would in a standard milk chocolate bar.
Keeping Your Chocolate Treats Fudgy and Fresh
These brownies are actually better on the second day. The fats have time to fully solidify, and the espresso flavor mellows into the chocolate. Keep them in an airtight container at room temperature for up to 4 days. If you like them extra fudgy, store them in the fridge; they become almost truffle like when cold.
For long term storage, wrap individual squares in plastic wrap and place them in a freezer bag for up to 3 months. To reheat, just pop a frozen square in the microwave for 20 seconds it will return to that molten, fresh out-of the-oven state instantly.
Don't throw away the crumbs at the bottom of the pan either! Those crunchy, chocolatey bits are incredible stirred into vanilla ice cream or sprinkled over morning yogurt.
Complementary Flavors for Your Decadent Chocolate Creation
Since this dessert is so rich, it cries out for something acidic or creamy to balance the palate. A dollop of unsweetened whipped cream or a scoop of tart raspberry sorbet works wonders.
If you're serving this at a dinner party, a sprinkle of flaky Maldon sea salt right before serving adds a beautiful visual contrast and a crunch that highlights the chocolate.
For a more sophisticated pairing, try serving a small glass of cold milk or even a dry red wine like a Cabernet Sauvignon. The tannins in the wine mirror the complexity of the 70% dark chocolate, creating a very "grown up" dessert experience. If you find yourself with extra chocolate left over, you can always try making a Chocolate Recipe like a mousse to serve alongside these brownies for a true "death by chocolate" platter.

Recipe FAQs
Is it necessary to use superfine blanched almond flour instead of standard almond meal?
Yes, it is highly recommended. Standard almond meal contains larger particles and skins, which leads to a noticeable gritty texture in the final fudge like crumb.
How do I achieve the signature shiny, crackly top crust?
Beat the eggs and sugar for a full five minutes until thick ribbons form. This step dissolves the sugar into the egg proteins, allowing the sugar to crystallize on the surface during baking.
What is the minimum internal temperature I should aim for to ensure a fudgy center?
Pull the dessert from the oven when it reaches 85°C (185°F). Carryover cooking will firm the structure slightly as it cools down on the counter to the ideal molten consistency.
How to store leftover gluten-free chocolate squares to maintain fudginess?
Store airtight at room temperature for up to four days. For a firmer, truffle like texture, keep them refrigerated, which helps the fats solidify around the crumb.
Can I substitute Dutch processed cocoa powder with natural cocoa powder in this recipe?
No, stick with Dutch processed if possible. Natural cocoa is more acidic and will affect the final color and moisture balance; you would need to add a pinch of baking soda to compensate if you must substitute.
How do I ensure the melted chocolate doesn't seize when adding it to the egg mixture?
Temper the eggs by slowly pouring the warm (not hot) chocolate mixture in while whisking constantly on low speed. This gradual temperature increase prevents the egg proteins from scrambling upon contact with the warm fat.
How can I guarantee the squares release cleanly from the baking pan?
Use parchment paper to create an overhang sling across both sides of the pan. If you master this leverage technique here, you’ll find similar lifting success in our Butter Cookie Recipe.
Fudgy gluten-free Brownies
Ingredients:
Instructions:
Nutrition Facts:
| Calories | 281 kcal |
|---|---|
| Protein | 4.0 g |
| Fat | 17.1 g |
| Carbs | 29.8 g |
| Fiber | 2.8 g |
| Sugar | 25.6 g |
| Sodium | 137 mg |
