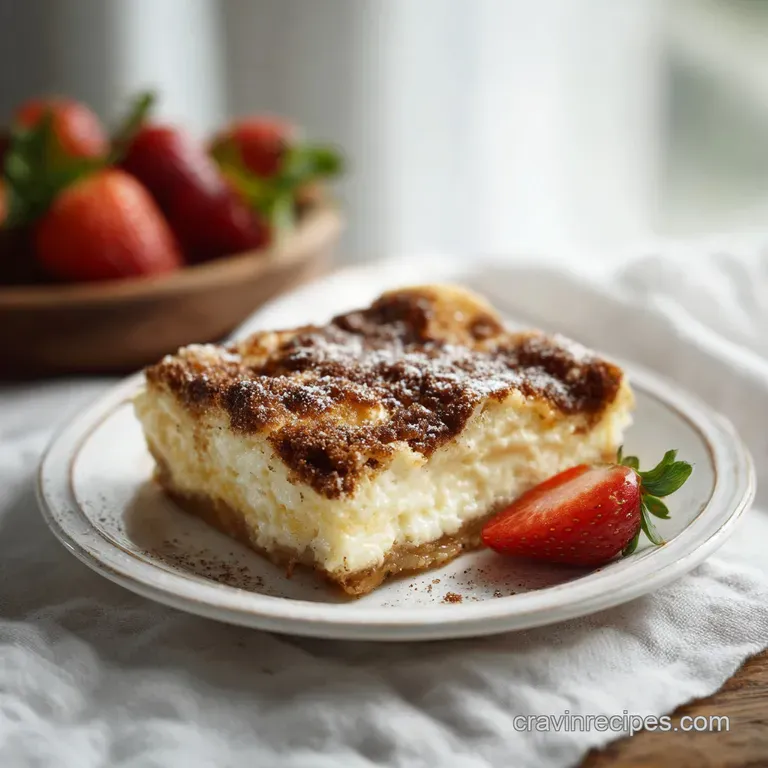
Sopapilla Cheesecake Bars Recipe
- Time: Active 15 minutes, Passive 30 minutes, Total 45 minutes
- Flavor/Texture Hook: Flaky, cinnamon spiced crunch with a velvety cream cheese center
- Perfect for: Cinco De Mayo celebrations or potluck desserts
The Logic of Flaky Layers
To get that iconic texture in your Sopapilla Cheesecake Bars, we have to respect the chemistry of the dough and the fats. When that cold crescent dough hits the preheated oven, the moisture in the butter layers turns to steam, pushing the dough apart to create those airy, flaky pockets we love.
Maillard Reaction: The cinnamon and sugar topping undergoes caramelization, creating a crisp, "shatter on-impact" crust that contrasts the soft filling.
Emulsification Stability: Adding a single egg to the cream cheese binds the fats and liquids, ensuring the center sets into a dense, velvety custard rather than a runny mess.
| Servings | Ingredient Adjustments | Pan Size | Cook Time |
|---|---|---|---|
| 8 people | 1 can dough, 8oz cheese, 0.5 cup sugar | 8x8 square | 25 minutes |
| 16 people | 2 cans dough, 16oz cheese, 1 cup sugar | 9x13 rectangle | 30 minutes |
| 32 people | 4 cans dough, 32oz cheese, 2 cups sugar | Two 9x13 pans | 35 minutes |
Choosing the right pan is half the battle. If you use a glass dish, the edges might brown faster than the center, so I usually reach for a light colored metal pan for a more even bake. If you only have glass, just keep a close eye on it starting at the 25 minute mark.
Component Analysis
Understanding why we use specific ingredients helps you avoid the common pitfalls of homemade Mexican Inspired Desserts. It isn't just about throwing things together; it is about how they interact under heat.
For example, using full fat cream cheese provides the structural integrity needed to hold up the heavy top layer of dough.
| Ingredient | Science Role | Pro Secret |
|---|---|---|
| Full fat Cream Cheese | Provides structural fat and tangy moisture | Always use brick style, never the whipped tub version |
| Granulated Sugar | Tenderizes the crumb and aids browning | Rubbing sugar with vanilla first intensifies the aroma |
| Large Egg | Acts as a protein binder for the filling | Room temp eggs incorporate without curdling the cheese |
| Raw Honey | Hygroscopic agent that keeps the crust shiny | Drizzle while the bars are still radiating heat |
If you are looking for a more traditional texture, you might also like my Mini Cheesecake Recipe which uses a similar ratio of cream cheese to sugar but in a bite sized format.
Pantry Staples and Substitutions
These Easy Sopapilla Cheesecake Bars rely on simple ingredients, but quality matters. I always suggest using a high-quality vanilla extract because it’s the primary flavor note in that creamy center. Here is exactly what you need to grab from the store.
- 2 cans (8 oz each) Refrigerated Crescent Roll Dough: The base and the lid. Why this? Provides the characteristic laminated layers without the work of puff pastry.
- Substitute: Sheets of puff pastry (thaw first and roll thin).
- 1 tbsp Unsalted Butter: For the pan. Why this? Prevents sticking while adding a hint of toasted flavor to the bottom.
- Substitute: Neutral cooking spray or parchment paper.
- 16 oz Full fat Cream Cheese, softened: The star of the show. Why this? low-fat versions have too much water and will make the bars soggy.
- Substitute: Neufchatel cheese (note: result will be slightly softer).
- 1 cup Granulated White Sugar: For the filling. Why this? Dissolves cleanly into the cheese for a silky mouthfeel.
- Substitute: Caster sugar for an even smoother texture.
- 1 tsp Pure Vanilla Extract: For depth. Why this? Cuts through the richness of the cheese.
- Substitute: Vanilla bean paste for those pretty black specks.
- 1 large Egg: The binder. Why this? Prevents the cheesecake layer from oozing when sliced.
- Substitute: 1/4 cup unsweetened applesauce (yields a denser, less airy filling).
- 1/4 cup Unsalted Butter, melted: For the topping. Why this? Glues the cinnamon sugar to the dough.
- Substitute: Salted butter (just skip any extra salt in the recipe).
- 1/2 cup Granulated Sugar: For the crust. Why this? Creates the essential crunch.
- Substitute: Brown sugar for a more "molasses" flavor profile.
- 1 tbsp Ground Cinnamon: The signature spice. Why this? Provides the warmth typical of Best Sopapilla Cheesecake Bars.
- Substitute: Apple pie spice or pumpkin pie spice for a twist.
- 1/4 cup Raw Honey: The finishing touch. Why this? Adds a floral sweetness and a sticky, glossy sheen.
- Substitute: Agave nectar or maple syrup.
Chef Tip: Freeze your cans of crescent dough for 10 minutes before opening. This makes the dough less sticky and much easier to unroll and press into the pan without it tearing or stretching too thin.
Tools for the Best Bake
You don't need a kitchen full of gadgets for this Simple Cream Cheese Bars recipe, but a few specific tools will make your life much easier.
First, a 9x13 inch baking pan is the standard. I prefer metal because it conducts heat more efficiently, giving you that golden bottom crust. An electric hand mixer (or a stand mixer) is pretty much essential for getting the cream cheese filling smooth.
If you try to do it by hand, you’ll likely end up with tiny lumps of cheese that won't disappear in the oven.
Finally, a sharp knife and a ruler can help you get those professional looking squares. For the cleanest cuts, you'll want to chill the bars completely first. For another crunchy variation, check out this Turtle Cheesecake recipe which also benefits from a solid chill time before serving.
step-by-step Baking Guide
Preheat your oven to 350°F (180°C). This ensures the dough starts puffing the second it hits the heat. If the oven isn't hot enough, the butter in the dough will melt out before the structure sets, leaving you with a greasy mess.
Phase 1: Preparing the Foundation
- Grease the pan. Use that 1 tbsp of butter to coat the bottom and sides of your 9x13 pan. Note: This creates a "fried" effect on the bottom dough layer.
- Lay the base. Unroll one can of crescent dough and press it into the bottom of the pan. Stretch it gently until it reaches all four corners.
- Seal the seams. Pinch the perforations together with your fingers so the cheesecake filling doesn't leak through.
Phase 2: Whipping Silky Filling
- Cream the cheese. Beat the 16 oz of softened cream cheese and 1 cup of sugar until the mixture looks like smooth frosting.
- Add aromatics. Mix in the vanilla and the egg. Note: Stop mixing as soon as the egg disappears to avoid whipping too much air into the bars.
- Spread the center. Pour the mixture over the bottom dough layer and smooth it out with a spatula.
Phase 3: The Cinnamon Crust
- Apply the lid. Unroll the second can of dough and carefully place it on top of the cheese layer. Pinch the edges to the bottom layer of dough.
- Butter and spice. Brush the 1/4 cup of melted butter over the top, then sprinkle the cinnamon sugar mixture evenly over the entire surface.
Phase 4: The Golden Bake
- Bake the bars. Place in the center rack for 30 minutes until the top is puffed and deep golden brown.
- Honey drizzle. Remove from the oven and immediately drizzle the honey over the top while it's still sizzling. Wait at least 30 minutes before slicing.
Solving Common Baking Mishaps
Even with the Sopapilla Cheesecake Bars Pillsbury method, things can go sideways. The most common complaint is a "soggy bottom." This usually happens because the oven wasn't preheated or the cream cheese was too watery.
Soggy bottom dough fixes.
If you notice the bottom isn't crisping up, you can move the pan to the lowest rack for the last 5 minutes of baking. This puts the dough in closer contact with the heat source. Also, make sure you aren't using "spreadable" cream cheese from a tub, which contains extra water.
Shrinking crescent dough tips.
Crescent dough is elastic. If you pull it too hard, it will snap back like a rubber band as it bakes. To avoid this, let the dough sit at room temperature for just 5 minutes before unrolling so the gluten relaxes. Press it into the corners firmly but gently.
| Problem | Root Cause | Solution |
|---|---|---|
| Filling is runny | Underbaked or skipped the egg | Bake until the center has a slight jiggle but isn't liquid |
| Top crust is burnt | Sugar caramelized too fast | Tent with foil if it browns too quickly |
| Dough is gummy | Oven temperature too low | Use an oven thermometer to verify 350°F (180°C) |
Common Mistakes Checklist
- ✓ Using cold cream cheese (results in lumpy filling)
- ✓ Forgetting to pinch the seams (filling leaks and burns)
- ✓ Drizzling honey too late (it won't soak into the crust)
- ✓ Slicing while hot (the cheesecake layer will collapse)
- ✓ Over mixing the egg (causes the filling to puff and then crack)
Flavor Variations to Try
While the classic version is hard to beat, you can easily tweak this recipe to fit different themes. For a "Churro Style" version, I like to double the cinnamon in the topping and serve it with a side of warm chocolate ganache for dipping. It's an indulgent way to level up the experience.
Adding fruity dessert twists.
You can swirl half a cup of raspberry or strawberry preserves into the cream cheese layer before adding the top dough. This adds a beautiful tartness that cuts through the sugar. If you love fruit based cheesecakes, you should definitely try my No Bake Strawberry recipe for a cooler, summer ready alternative.
Lower fat adjustment ideas.
If you want to shave off some calories, you can use Neufchatel cheese and swap the melted butter on top for a light coating of butter flavored cooking spray. You'll lose some of that "shatter" in the crust, but the flavor remains surprisingly close to the original.
Just don't go for fat free cream cheese it simply won't set.
Scaling for Large Crowds
Scaling this recipe is incredibly straightforward since it’s based on standard can sizes. However, there are a few things to keep in mind if you are doubling or halving the batch.
Scaling Down (1/2 Batch): Use an 8x8 inch square pan. You will only need one can of dough cut it in half and use one half for the bottom and one for the top. Reduce the bake time by about 5 minutes, as the smaller surface area heats up more quickly.
Scaling Up (2x Batch): I highly recommend using two separate 9x13 pans rather than one giant sheet pan. This ensures the edges get crispy and the center cooks through.
If you must use a larger pan, increase the bake time by 10 minutes and use 1.5x the cinnamon and spices to avoid overwhelming the palate.
Storage and Shelf Life
These bars are one of the few desserts that actually taste better the next day. As they sit, the honey and cinnamon sugar meld into a sticky, syrupy glaze that permeates the top layer of dough.
- Fridge: Store in an airtight container for up to 5 days. The crust will soften slightly over time, but the flavors deepen.
- Freezer: You can freeze these for up to 3 months. Wrap individual squares in plastic wrap, then place them in a freezer bag. Thaw in the fridge overnight before eating.
- Zero Waste: If you have leftover dough scraps, roll them in the remaining cinnamon sugar and bake them on a cookie sheet for "crescent fries."
Perfect Serving Ideas
While these bars are a complete experience on their own, a few additions can make them feel like a restaurant style dessert. I personally love serving them slightly warm with a scoop of cold vanilla bean ice cream. The contrast between the hot cinnamon crust and the melting ice cream is heavenly.
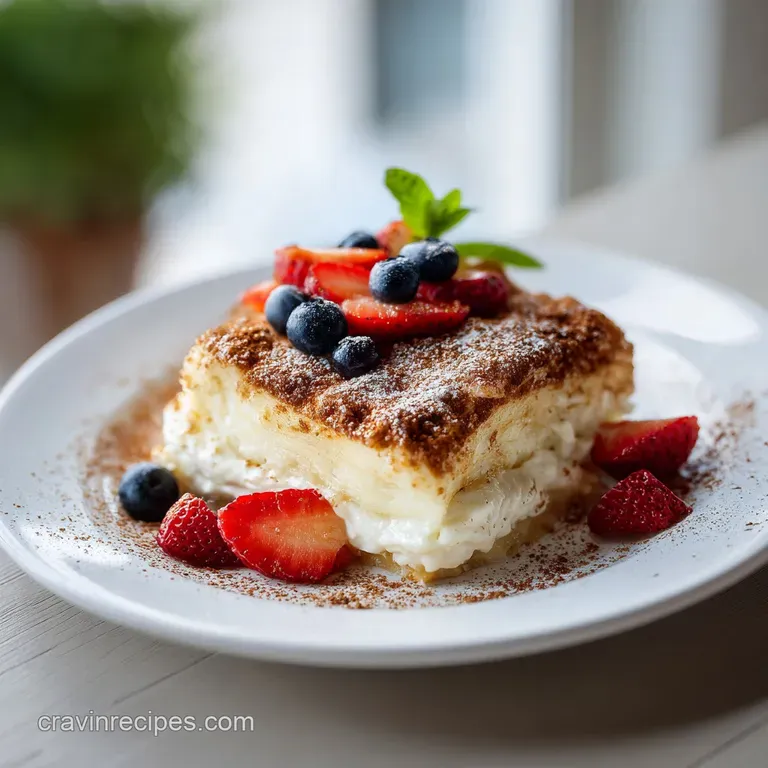
If you're serving these at a Cinco De Mayo party, a side of fresh berries or a dollop of whipped cream stabilized with a pinch of cinnamon is a great touch. You could even serve them alongside some Homemade Granola Bars recipe if you're putting together a snack table for a kids' party they offer a nice textural variety!
Chef Tip: For the most beautiful presentation, use a warm, slightly damp knife to slice the bars. Wipe the blade clean between every single cut. This prevents the cream cheese from smearing across the top of the golden cinnamon crust.
Honestly, don't even worry about leftovers. Every time I make these, the pan is empty before I can even get my own piece. Trust me, the combination of that gooey center and the crispy, honey soaked top is something your friends will be texting you about for weeks.
Get that oven preheated and let the aroma of cinnamon take over your house!

Recipe FAQs
Do you eat sopapilla cheesecake bars warm or cold?
Slightly warm or room temperature is best. If eaten straight from the fridge, the cream cheese filling will be too firm. Wait at least 30 minutes after baking before slicing for the best texture.
Do you need eggs for sopapilla cheesecake?
Yes, one large egg is necessary. The egg acts as a crucial protein binder, setting the cream cheese filling into a velvety custard rather than allowing it to remain a runny liquid when baked.
What exactly are sopapilla cheesecake bars?
They are a layered dessert combining two textures. The base and top crust use refrigerated crescent roll dough, which encases a rich, slightly sweet cream cheese filling spiced with cinnamon and topped with honey.
How much cream cheese for sopapilla cheesecake bars?
You typically need 16 ounces of cream cheese. This amount is standard for a 9x13 inch pan recipe and ensures the cheesecake layer is thick enough to hold its shape when sliced.
How to prevent the top crust from burning before the center sets?
Tent the pan lightly with aluminum foil halfway through baking. If the cinnamon sugar topping starts darkening too quickly around the 20-minute mark, covering it loosely prevents scorching while allowing the center to finish cooking.
Is it true that you must use brick style cream cheese?
Yes, use brick style cream cheese for structural integrity. The tub varieties contain too much added water, which will prevent your cheesecake layer from setting properly, resulting in a softer, potentially soggy bar.
How to get the cleanest slices for presentation?
Chill the baked bars completely before cutting. Use a long, sharp knife, wiping the blade clean and warm between every single slice to ensure the crust doesn't tear or smear the filling.
Sopapilla Cheesecake Bars Recipe

Ingredients:
Instructions:
Nutrition Facts:
| Calories | 318 kcal |
|---|---|
| Protein | 3.3 g |
| Fat | 18.6 g |
| Carbs | 34.1 g |
| Fiber | 0.4 g |
| Sugar | 24.2 g |
| Sodium | 312 mg |
