Classic Homemade Apple Pie with Flaky Crust

- Total2 Hrs 50 Mins
- Calories534 kcal
- CuisineAmerican
- Time: 30 min active + 1 hour chilling + 15 min resting + 65 min baking
- Flavor & Texture: Buttery, flaky crust with a gooey, spiced center
- Perfect for: Holiday gatherings, family Sundays, or treating guests
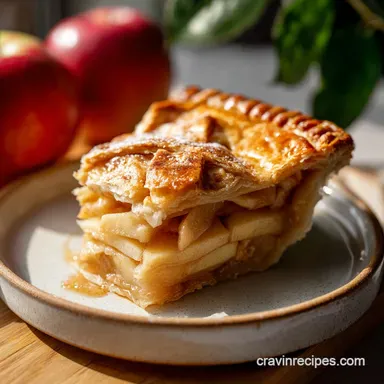
The sound of a knife cracking through a dark golden crust is the best part of this process. You get that satisfying shatter, followed by a heap of warm, softened apples that still hold their shape.
This version focuses on the contrast between the salty, buttery pastry and the deep sweetness of the filling. It's an indulgent treat that fills the house with a scent of caramelized sugar and warm spices.
You can expect a pie that doesn't slump or leak. The trick is in the apple choice and the resting time, making it a reliable choice for any dessert table.
Classic Homemade Apple Pie
Cold Fat: Using chilled butter creates tiny steam pockets during baking, which push the dough apart into flaky layers.
Apple Balance: Mixing tart Granny Smith with sweet Honeycrisp prevents the filling from tasting one-dimensional or turning into mush.
Starch Control: Letting the filling sit for 15 minutes allows the cornstarch to bond with the juices, which thickens the sauce in the oven.
| Method | Time | Texture | Best For |
|---|---|---|---|
| Single Crust | 90 mins | Softer bottom | Casual weeknight |
| Double Crust | 170 mins | Flaky and encased | Holiday feasts |
Necessary Tools
You'll need a 9-inch deep-dish pie plate to hold the heaping filling. A pastry cutter or two forks helps break down the butter without melting it with your hands.
A rolling pin and a floured surface are a must for getting the crust thin and even. If you have a lattice cutter, it's handy, but a sharp knife works just as well for steam vents.
What Each Ingredient Does
| Ingredient | What It Does | Best Swap |
|---|---|---|
| Unsalted Butter | Creates flakiness | Chilled margarine (Note: Less rich flavor) |
| Cornstarch | Thickens apple juices | Arrowroot powder (Use slightly less) |
| Honeycrisp/Granny Smith | Provides structure and tang | Braeburn or Jonagold (Similar texture) |
| Sanding Sugar | Adds crunch and sparkle | Turbinado sugar (Coarser grain) |
Gathering Your Essentials
For the Pastry
- 2½ cups (315g) all-purpose flour
- 1 tsp (6g) salt
- 1 tbsp (12g) granulated sugar
- 1 cup (225g) unsalted butter, chilled and cubed Why this? High fat content makes the crust shatter.
- 8 tbsp (120ml) ice water
For the Filling
- 3 lbs (1.3kg) apples, peeled and sliced (mix of Granny Smith and Honeycrisp)
- ¾ cup (150g) brown sugar, packed
- 2 tbsp (16g) cornstarch Why this? Prevents a watery, runny bottom.
- 1 tbsp (8g) ground cinnamon
- ¼ tsp (1g) ground nutmeg
- ¼ tsp (1.5g) salt
- 1 tbsp (15ml) lemon juice
- 1 tsp (5ml) vanilla extract
For the Finish
- 1 large egg
- 1 tbsp (15ml) milk
- 1 tbsp (12g) coarse sanding sugar
| Original Ingredient | Substitute | Why It Works |
|---|---|---|
| Brown Sugar | Coconut Sugar | Similar depth. Note: Slightly less caramel flavor |
| All-Purpose Flour | gluten-free Blend | Works with xanthan gum. Note: Crust is more fragile |
The Cooking Process
Phase 1: Preparing the Pastry
- Preheat oven to 425°F (220°C).
- Whisk 315g all-purpose flour, 6g salt, and 12g granulated sugar in a large bowl.
- Work in 225g chilled, cubed unsalted butter using a pastry cutter until the mixture resembles coarse crumbs with some pea-sized lumps remaining. Note: Those lumps are what create the flakes.
- Gradually add up to 120ml ice water, one tablespoon at a time, stirring with a fork until the dough just holds together.

- Divide dough into two discs, wrap in plastic, and refrigerate for 1 hour.
Phase 2: Crafting the Filling
- Toss 1.3kg peeled and sliced apples with 15ml lemon juice.
- In a separate bowl, whisk together 150g brown sugar, 16g cornstarch, 8g ground cinnamon, 1g ground nutmeg, and 1.5g salt.
- Pour the dry mixture over the apples and stir in 5ml vanilla extract until every slice is coated.

- Let the apple mixture sit for 15 minutes to allow the sugars to draw out moisture. Listen for the slight bubbling sound as the sugar dissolves.
Phase 3: Assembly and Baking
- Roll out the first dough disc on a floured surface and press it firmly into the bottom of a 9-inch deep-dish pie plate.
- Pour the apple mixture into the crust, heaping them slightly in the center.
- Roll out the second dough disc and place it over the top; cut slits for steam or create a lattice weave.

- Brush the top with a mixture of 1 large egg and 15ml milk, then sprinkle with 12g coarse sanding sugar.
- Bake at 425°F (220°C) for 15 minutes. The edges should start to set and smell like toasted butter.
- Reduce oven temperature to 375°F (190°C) and bake for another 45–50 minutes until the crust is dark golden and the filling is bubbling.
Chef: If the edges brown too quickly during the last 20 minutes, lean a strip of foil over them to stop the burning.
When It Does Not Turn Out
Stopping a Soggy Bottom
This happens when the bottom crust doesn't cook as fast as the filling. Place your rack in the lowest position of the oven to get more heat under the plate. Also, don't overwork the dough, as too much gluten makes the crust tough and less absorbent.
Avoiding Burnt Edges
Since the edges are exposed and thin, they cook faster than the center. Use a pie shield or a simple ring of aluminum foil to cover the rim after the first 15 minutes of baking.
Fixing a Runny Filling
If the juices are too thin, you likely used apples with too much water or skipped the resting step. Next time, increase the cornstarch by a teaspoon or ensure the apples sit in the sugar mix for the full 15 minutes before filling the crust.
Keeping It Fresh
Store leftovers in an airtight container in the fridge for up to 4 days. If you want to prep ahead, you can freeze the unbaked pie for up to 2 months. Wrap it tightly in plastic and foil, then bake it straight from the freezer, adding 15–20 minutes to the cooking time.
To get that crisp texture back, avoid the microwave. Reheat individual slices in a 350°F (175°C) oven for 10 minutes, or until the center reaches 165°F (74°C).
Creative Twist Ideas
Apple Pie Dutch
Instead of a top crust, mix 1 cup of flour, 1/2 cup brown sugar, and 1/2 cup cold butter into crumbs. Sprinkle this over the filling for a streusel-style top.
Salted Caramel Twist
Drizzle 2 tablespoons of salted caramel sauce over the apples before adding the top crust. This adds a deep, burnt-sugar note to the center.
Gluten-free Adaptation
Use a 1:1 gluten-free flour blend that includes xanthan gum. The dough will be slightly softer, so chill it for an extra 30 minutes before rolling.
Serving and Enjoying

I prefer this warm with a dollop of vanilla ice cream. The combination of chilled cream and hot, spiced fruit is the absolute highlight. For a more luxurious experience, a splash of heavy cream or a sprinkle of sea salt helps balance the sweetness.
Some people follow the Grandma s Secret Recipe with apple pie method by adding a bit of allspice, which I think adds wonderful depth. Just remember to let the pie cool for at least 2 hours before slicing to ensure the filling is set and doesn't run.
Questions Readers Ask
What is the secret to a good apple pie?
Use a mix of tart and sweet apples. This balance prevents the filling from tasting one-dimensional or becoming too mushy.
Should you cook apples before putting them into a pie?
No, use them raw. This recipe allows the apples to soften and release juices naturally during the 65 minutes of baking.
Why use both Granny Smith and Honeycrisp apples?
Combining these varieties provides a balance of tartness and sweetness. It ensures the fruit holds its shape while offering a rich flavor.
How to prevent the crust from becoming soggy?
Let the filling sit for 15 minutes before baking. This allows the cornstarch to bond with the juices to thicken the sauce.
Can I make this pie with a single crust?
Yes, you can use a single crust for a more casual version. This results in a softer bottom and a shorter total time of 90 minutes.
Why must the butter be chilled?
Cold butter creates tiny steam pockets when it hits the oven heat. These pockets push the dough apart to create flaky layers.
Where do I store the finished pie?
Keep it in an airtight container in the fridge and eat leftovers within 4 days.
Does the apple filling need to rest?
Yes, let it sit for 15 minutes. This step allows the brown sugar to draw out moisture and ensures the filling thickens properly.
Apple Pie with Flaky Crust
Ingredients:
Instructions:
You May Also Like

Air Fryer Donuts: Fluffy Homemade Treats
Master Air Fryer Donuts with our step-by-step timing guide. Perfect for quick air fryer dessert…

Apple Pie Filling Recipe: Tender Crisp Apples
Master the ultimate apple pie filling recipe with our dual-sugar technique.
