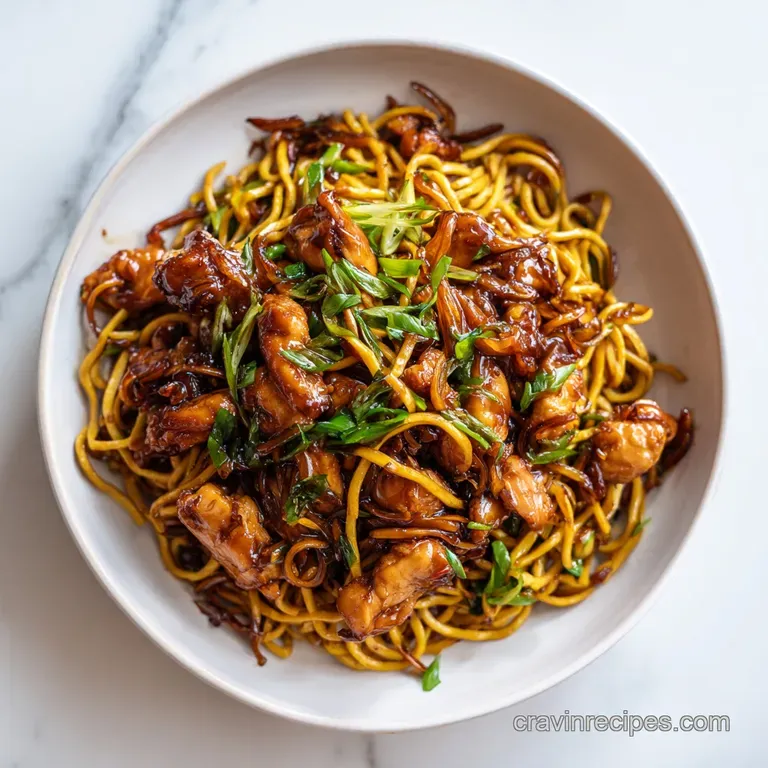
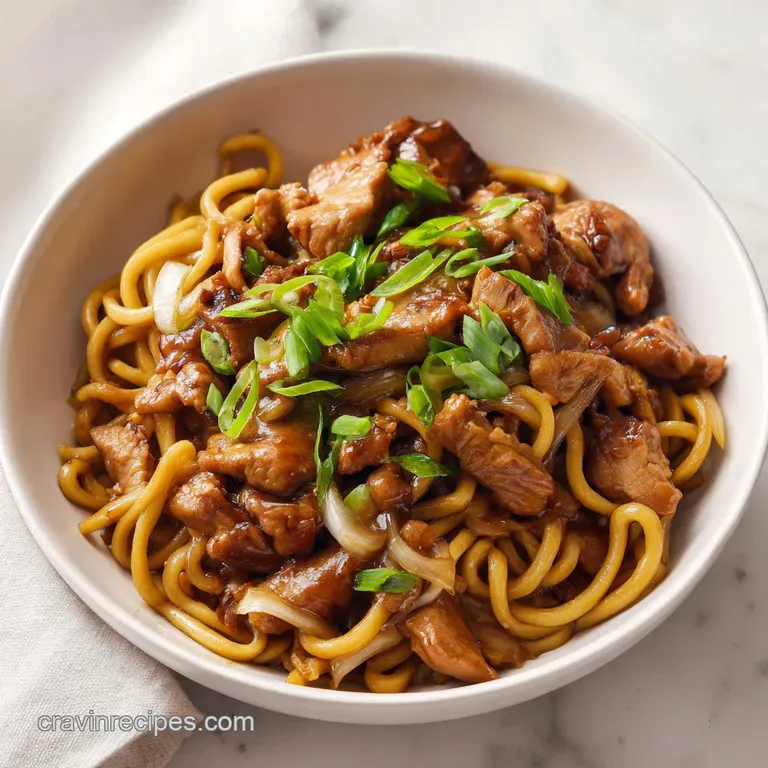
Sticky Garlic Chicken Noodles: Golden and Savory
- Time: 10 min active + 15 min cooking = Total 25 mins
- Flavor/Texture Hook: Glossy, velvety sauce with a savory garlic punch
- Perfect for: Easy weeknight dinner
- Sticky Garlic Chicken Noodles Secret
- The Recipe Specs
- Shopping List Details
- Gear You Need
- Detailed Cooking Steps
- Fixing Common Problems
- Troubleshooting Common Issues
- Fresh Flavor Twists
- Adjusting the Portion Size
- Freezing and Reheating Guide
- Serving Your Meal
- Kitchen Truths
- Critical in Sodium
- Recipe FAQs
- 📝 Recipe Card
That first scent of garlic hitting hot oil is what gets me every time. It's that immediate, pungent aroma that fills the kitchen and tells everyone in the house that dinner is actually happening.
I remember one chaotic Tuesday when I had exactly twenty minutes before the kids had to leave for practice, and I was staring at some plain chicken breasts and a pack of noodles. I didn't have time for a slow simmer or a complex marinade, so I just tossed the chicken in a bit of cornstarch and cranked the heat.
The result was a total accident that turned into a staple. The chicken didn't just cook, it developed this gorgeous, golden brown sear that acted like a sponge for the honey and soy. When the noodles hit that pan and soaked up every last drop of that glossy glaze, it was a win.
Since then, this sticky garlic chicken noodles recipe has become my go to when I need something that feels like takeout but doesn't take an hour to arrive.
You can expect a dish that is salty, sweet, and deeply savory. It's not a delicate meal, it's hearty comfort food that doesn't mess around. We're aiming for chicken that has a slight "snap" to the outside and noodles that are perfectly coated in a thick, clingy sauce.
If you've ever had noodles that end up swimming in a watery soup at the bottom of the bowl, this is the fix for that.
Sticky Garlic Chicken Noodles Secret
When you're making sticky garlic chicken noodles, the real win isn't in the sauce itself, but in how the chicken is prepared. Most people just throw raw meat into a pan, but that leads to steaming rather than searing. By tossing the chicken in a tiny bit of cornstarch first, you're creating a protective barrier.
This allows the chicken to get that golden exterior without overcooking the inside.
Then there's the glaze. The combination of honey and soy sauce creates a natural syrup as it bubbles. When we add the cornstarch slurry at the end, it binds everything together into a velvety coating. It's the difference between a sauce that runs off the noodle and one that actually sticks to it.
Trust me, skipping the slurry is the biggest mistake you can make here.
For the noodles, I always suggest a quick toss in sesame oil after draining. This is a little trick I picked up to ensure they don't turn into one giant clump of dough while you're searing the chicken. It keeps them slippery and individual, making the final toss in the pan much smoother.
Why the Sauce Actually Sticks
- The Starch Shield: Cornstarch on the chicken creates a textured surface that grips the sauce.
- Sugar Reduction: Heating honey causes water to evaporate, leaving behind a thick, sticky concentrate.
- Slurry Binding: Adding a cornstarch water mix at the end creates a stable gel that prevents the sauce from separating.
- Noodle Porosity: Lo mein noodles have a slightly rougher surface than Italian pasta, which helps the glaze adhere.
| Method | Time | Texture | Best For |
|---|---|---|---|
| Stovetop | 25 mins | Crispy chicken, glossy sauce | Weeknight speed |
| Oven | 45 mins | Softer chicken, pooled sauce | Hands off cooking |
The Recipe Specs
To get this right, you need to focus on the heat. We're using a medium high setting to ensure the chicken sears without burning the honey in the sauce. If the pan is too cold, the chicken will release its juices and boil in its own liquid. If it's too hot, the garlic will turn bitter and black in seconds.
Consistency is key with the chicken size. I always cut mine into uniform 2cm cubes. If some pieces are huge and others are tiny, you'll end up with some that are rubbery and some that are raw. Taking an extra two minutes to get the cuts even makes a massive difference in the final texture.
Regarding the noodles, don't overcook them in the water. Since they're going back into the pan with the sauce for another couple of minutes, you want them slightly "al dente." If they're too soft going in, they'll break apart when you toss them with the chicken.
Shopping List Details
For the protein, boneless skinless chicken breast is the standard. It's lean and cooks fast. If you're looking for more moisture, you can use thighs, but you'll need to trim the excess fat so it doesn't make the sauce greasy.
For the best results, I recommend using a high-quality soy sauce; avoid the super cheap ones that taste mostly like salt.
The honey is what provides that signature "sticky" feel. You can use maple syrup if you're out, but honey has a thicker viscosity that holds onto the noodles better. The oyster sauce is the secret weapon here. It adds a deep, briny umami that soy sauce alone can't achieve. According to Serious Eats, cornstarch is the ideal thickener for these kinds of glazes because it creates a clear, glossy finish rather than a cloudy one.
For the Protein & Base
- 1 lb boneless skinless chicken breast, cut into bite sized pieces Why this? Lean and absorbs flavors quickly
- 12 oz lo mein noodles Why this? Traditional texture and sauce gripping ability
- 2 tbsp neutral oil Why this? High smoke point prevents burning
- 1 tbsp cornstarch Why this? Creates the golden crust
- 1/2 tsp salt Why this? Essential base seasoning
For the Sticky Garlic Glaze
- 4 cloves garlic, minced Why this? Provides the pungent, aromatic core
- 1 tsp fresh ginger, grated Why this? Adds a sharp, fresh contrast to the honey
- 1/4 cup soy sauce Why this? Primary salt and color source
- 3 tbsp honey Why this? Creates the sticky, sweet glaze
- 1 tbsp oyster sauce Why this? Adds deep savory umami notes
- 1 tbsp rice vinegar Why this? Cuts through the sweetness with acidity
- 1 tsp sesame oil Why this? Adds a toasted, nutty aroma
- 1 tsp cornstarch mixed with 1 tbsp water Why this? The final thickener for the gloss
For the Garnish
- 2 stalks green onions, sliced Why this? Fresh crunch and color
- 1 tbsp toasted sesame seeds Why this? Adds texture and a nutty finish
| Original Ingredient | Substitute | Why It Works |
|---|---|---|
| Lo Mein Noodles | Spaghetti | Similar shape. Note: Lacks the alkaline "snap" of lo mein |
| Honey | Maple Syrup | Same sweetness level. Note: Adds a distinct woody flavor |
| Oyster Sauce | Hoisin Sauce | Similar savory sweet profile. Note: Thicker and sweeter |
| Chicken Breast | Chicken Thighs | Higher fat content. Note: More juicy but requires more trimming |
Gear You Need
You don't need a professional kitchen for this. A large skillet or a wok is the main tool. The wider the pan, the better. If you use a small pot, the chicken will crowd, the temperature will drop, and you'll lose that sear.
I use a 12 inch stainless steel skillet because it handles high heat well and allows the sauce to reduce quickly.
A good whisk is helpful for the sauce, but a fork works just fine. You'll also want a silicone spatula or tongs. Tongs are better for flipping the chicken, while the spatula is great for scraping up those brown bits from the bottom of the pan. Those bits, known as fond, are where the most flavor lives.
Finally, make sure you have a colander for the noodles. If you try to drain them using just the pot lid, you risk losing some noodles down the drain or splashing boiling water on your hands. Keep it simple and use the right tool for the job.
Detailed Cooking Steps
Right then, let's get into the actual cooking. Make sure you have your sauce whisked and your garlic minced before you turn on the stove. This is a fast recipe, and you don't want to be chopping ginger while your chicken is burning.
Phase 1: The Prep Work
- Cook noodles according to package instructions. Drain and toss with a drop of sesame oil to prevent sticking. Note: This keeps the noodles individual for the final toss.
- In a bowl, toss the chicken pieces with salt and 1 tablespoon of cornstarch. Note: Ensure every piece is lightly coated for a uniform crust.
- In a small bowl, whisk together soy sauce, honey, oyster sauce, rice vinegar, and sesame oil; set aside.
Phase 2: Searing the Chicken
- Heat neutral oil in a large skillet or wok over medium high heat until shimmering. Note: Shimmering oil means it's hot enough to sear instantly.
- Add chicken in a single layer and sear undisturbed for 3 minutes until a golden brown crust forms. Note: Don't move them; let the crust develop.
- Flip the chicken and cook for another 2-3 minutes until cooked through, then remove chicken from the pan and set aside on a plate.
Phase 3: The Sticky Reduction
- In the same pan, add minced garlic and ginger and sauté for 30 seconds until fragrant. Note: Watch closely so the garlic doesn't brown too much.
- Pour in the whisked glaze and let it bubble for 1-2 minutes. Note: You're looking for the sauce to start reducing and smelling sweet.
- Stir in the cornstarch slurry and simmer until the sauce thickens into a glossy glaze. Note: It should coat the back of a spoon easily.
Phase 4: The Final Toss
- Return the chicken and cooked noodles to the pan, tossing until evenly coated. Note: Use tongs to ensure the sauce reaches every noodle.
- Garnish with sliced green onions and toasted sesame seeds.
Chef's Note: If you're using a very hot wok, the sauce might thicken faster than expected. Keep a tablespoon of water handy to thin it out if it becomes too "gluey" before the noodles go in.
Fixing Common Problems
Even with a simple recipe, things can go sideways. Usually, it comes down to heat management or timing. If your sauce isn't sticking, it's likely because the cornstarch slurry wasn't given enough time to simmer or the pan wasn't hot enough to reduce the sugars.
Troubleshooting Common Issues
| Issue | Solution |
|---|---|
| Why Your Sauce Is Too Thin | If the sauce is watery, it's usually because the cornstarch slurry didn't reach the necessary temperature to activate. Cornstarch needs to hit a simmer to thicken. If you added the noodles too quickly |
| Why Your Garlic Is Burning | Garlic has a very low burn point compared to chicken. If you add it to the pan while the oil is smoking hot from the chicken sear, it will burn in seconds. The trick is to let the pan cool for just a |
| Why Your Noodles Are Clumping | This usually happens if the noodles were overcooked in the water or if they sat too long without oil. Once they hit the pan, if the sauce is too thick, they might stick together in chunks rather than |
Common Mistakes Checklist
- ✓ Don't crowd the pan; sear chicken in batches if needed.
- ✓ Don't skip the cornstarch dredge on the raw chicken.
- ✓ Don't stir the chicken constantly; let it sit to brown.
- ✓ Don't overcook the noodles; remember they cook more in the sauce.
- ✓ Don't forget to whisk the slurry immediately before adding.
Fresh Flavor Twists
Once you've nailed the basic sticky garlic chicken noodles, you can start playing with the profile. The honey soy base is very forgiving, so you can lean into different directions depending on what's in your fridge. If you enjoy a bit of a sear and a pan sauce, you might also appreciate the technique used in my Chicken Piccata recipe, which also relies on a quick sear and a reduced sauce.
The Spicy Kick
For those who like heat, add 1 tablespoon of Sriracha or Chili Garlic Sauce to the glaze. For an even deeper heat, throw in some dried red pepper flakes when you sauté the garlic and ginger. This adds a layer of warmth that cuts through the sweetness of the honey.
The Garden Boost
If you want to make this a bit healthier, toss in some sliced bell peppers, snap peas, or broccoli florets. Sauté the vegetables right after the garlic and ginger, but before you pour in the sauce. This ensures the veggies stay crisp and don't get mushy.
The Low Carb Swap
You can easily turn this into a high protein, low carb meal by swapping the lo mein noodles for zucchini noodles or shredded cabbage. Just be careful with the timing; zucchini noodles only need about 1-2 minutes in the pan, or they'll release too much water and thin out your sauce.
The Nutty Twist
Double down on the nuttiness by adding a tablespoon of peanut butter or almond butter to the sauce. This transforms the dish into something closer to a satay. It makes the sauce even more velvety and adds a richness that kids absolutely love.
Adjusting the Portion Size
When scaling this recipe, you can't just double everything blindly. Salt and thickeners behave differently in larger volumes. If you're cooking for a crowd, the biggest challenge is the pan size.
Scaling Down (for 2 people) Halve all ingredients, but don't halve the oil you still need enough to cover the bottom of the pan for a proper sear. Reduce the cooking time for the sauce reduction by about 20%, as a smaller amount of liquid evaporates much faster.
Scaling Up (for 8 people) If you're doubling the recipe, cook the chicken in two separate batches. If you crowd the pan with 2 lbs of chicken, it will steam and turn grey instead of browning. For the sauce, increase the soy and honey by 2x, but only increase the cornstarch slurry by 1.5x.
Too much starch in a large batch can make the sauce feel gummy rather than glossy.
If you find yourself making large batches of chicken dishes often, you might like the ease of my Hamburger Helper pasta, which is another great one pot meal for families.
Freezing and Reheating Guide
This dish is surprisingly freezer friendly, though the noodles can sometimes get a bit soft. The best way to store it is to keep the chicken and noodles separate if you're planning to freeze them for a long time.
Fridge Storage Store in an airtight container for up to 3 days. The sauce will thicken as it cools, which is normal. When you reheat it, you'll need a splash of water to loosen the glaze back up.
Freezing Instructions You can freeze the cooked sticky garlic chicken noodles for up to 2 months. I recommend undercooking the noodles by another minute if you know you're going to freeze them. This prevents them from becoming mushy during the reheating process.
Wrap them tightly in foil or use a vacuum sealed bag to prevent freezer burn.
Reheating the Right Way Avoid the microwave if you can; it tends to make the chicken rubbery. Instead, toss the noodles and chicken back into a skillet over medium heat.
Add 1-2 tablespoons of water or chicken broth, cover with a lid for 2 minutes to steam, and then stir fry for another minute until the sauce is glossy again.
Serving Your Meal
The presentation makes a big difference here. Since the dish is a monochromatic brown, the green onions and sesame seeds are essential for visual appeal. I like to serve this in shallow bowls rather than plates, which keeps the heat in and makes it easier to twirl the noodles.
For a complete meal, pair this with a side of steamed bok choy or a simple cucumber salad with rice vinegar and sesame oil. The acidity of a cold salad balances the richness of the sticky glaze.
If you're feeling fancy, serve it with a wedge of lime on the side; a squeeze of fresh lime juice right before eating wakes up all the flavors.
Avoid over garnishing. A few sprigs of green onion and a sprinkle of seeds are enough. The star of the show is the chicken and the glaze, so let them shine. Right then, you've got a restaurant quality dinner on the table in under half an hour.
Kitchen Truths
There are a few things people tell you about stir fries that just aren't true. I've spent enough time in my own kitchen to realize that some "rules" are just myths.
Myth: You need a wok for stir fry. While a wok is great, a wide stainless steel or cast iron skillet works just as well. The most important thing is the surface area and the heat, not the shape of the pan.
Myth: Searing "locks in" the juices. Searing doesn't actually seal the meat. The moisture loss happens regardless. However, the sear creates a massive amount of flavor through browning, which is why we do it. It's about taste, not moisture retention.
Myth: You must use authentic Lo Mein. While lo mein is best, any long noodle will work in a pinch. Even spaghetti, if boiled in salted water, can carry the sauce well enough for a Tuesday night dinner. Just don't use something like angel hair, which will dissolve into the sauce.
Critical in Sodium
1140 mg 1,140 mg of sodium per serving (50% 50% of daily value)
The American Heart Association recommends a daily sodium limit of 2,300 mg, with an ideal limit of 1,500 mg for most adults to maintain heart health.
Personalized Sodium Reduction Tips
-
Eliminate Added Salt-25%
Remove the 1/2 tsp of salt completely; the sauces already provide more than enough sodium to season the chicken.
-
Swap Soy Sauce-20%
Replace the regular soy sauce with low-sodium soy sauce or coconut aminos to drastically reduce the primary salt source.
-
Moderate Oyster Sauce-20%
Reduce the oyster sauce to 1/2 tbsp or use a low-sodium alternative to keep the savory flavor with less salt.
-
Rinse the Noodles-10%
Rinse the lo mein noodles under warm water after boiling to remove surface salts often found in processed noodles.
-
Enhance Fresh Aromatics
Double the amount of fresh garlic and grated ginger to add bold flavor and complexity without adding any sodium.
Recipe FAQs
How to prevent the noodles from clumping together?
Toss them with a drop of sesame oil immediately after draining. This creates a thin barrier that keeps the strands separate until they are added to the pan.
Why is my garlic burning before the sauce is added?
The pan is too hot from searing the chicken. Let the skillet cool for a few seconds before adding the minced garlic and ginger to prevent them from scorching.
How to get the chicken to develop a golden brown crust?
Sear the chicken undisturbed for 3 minutes in shimmering neutral oil. Avoid stirring the pieces too early, as the direct contact is what creates the crust.
Why is my sauce too thin even after adding the slurry?
The sauce likely hasn't reached a simmer. Cornstarch must hit a specific temperature to activate; continue simmering the glaze until it thickens and becomes glossy.
Is it true that I can skip the cornstarch coating on the chicken?
No, this is a common misconception. The cornstarch creates a surface that browns better and helps the sticky honey soy glaze adhere to the meat.
How to achieve a glossy, thick finish on the sauce?
Simmer the cornstarch slurry for 1-2 minutes until it bubbles. This process transforms the liquid into a professional, mirror like glaze.
Can I use this flavor balancing technique in other dishes?
Yes, balancing sweet and savory is a foundational skill. If you loved the sweet savory contrast in this glaze, see how we use a similar balance in our beet and feta salad.
Sticky Garlic Chicken Noodles

